1. Account Creation Guide
To use Exment Manager, you need to register a user account.
Existing Exment OpenSource users who want to use Exment Manager, as well as users who want to use Exment SaaS, should register an account.
1.1 How to Create an Exment OpenSource User
When an existing Exment OpenSource user uses Exment Manager, the account must be registered with the domain name where the currently used Exment system is running.
The domain name may be one that is not publicly available on the internet, such as one that cannot be resolved by DNS from outside. Enter the domain without including the scheme such as http:// or https://. The following TLDs cannot be used.
.local, .test, .localhost, .invalid, .example
The registered domain name is used when purchasing plugins. Purchased plugins are encrypted so that they operate only on Exment for the registered domain name.
Once account registration is complete, you can use our Plugin Market and access the plugin repository for the Exment system.
Access the Exment Manager portal site (https://exment.org/).
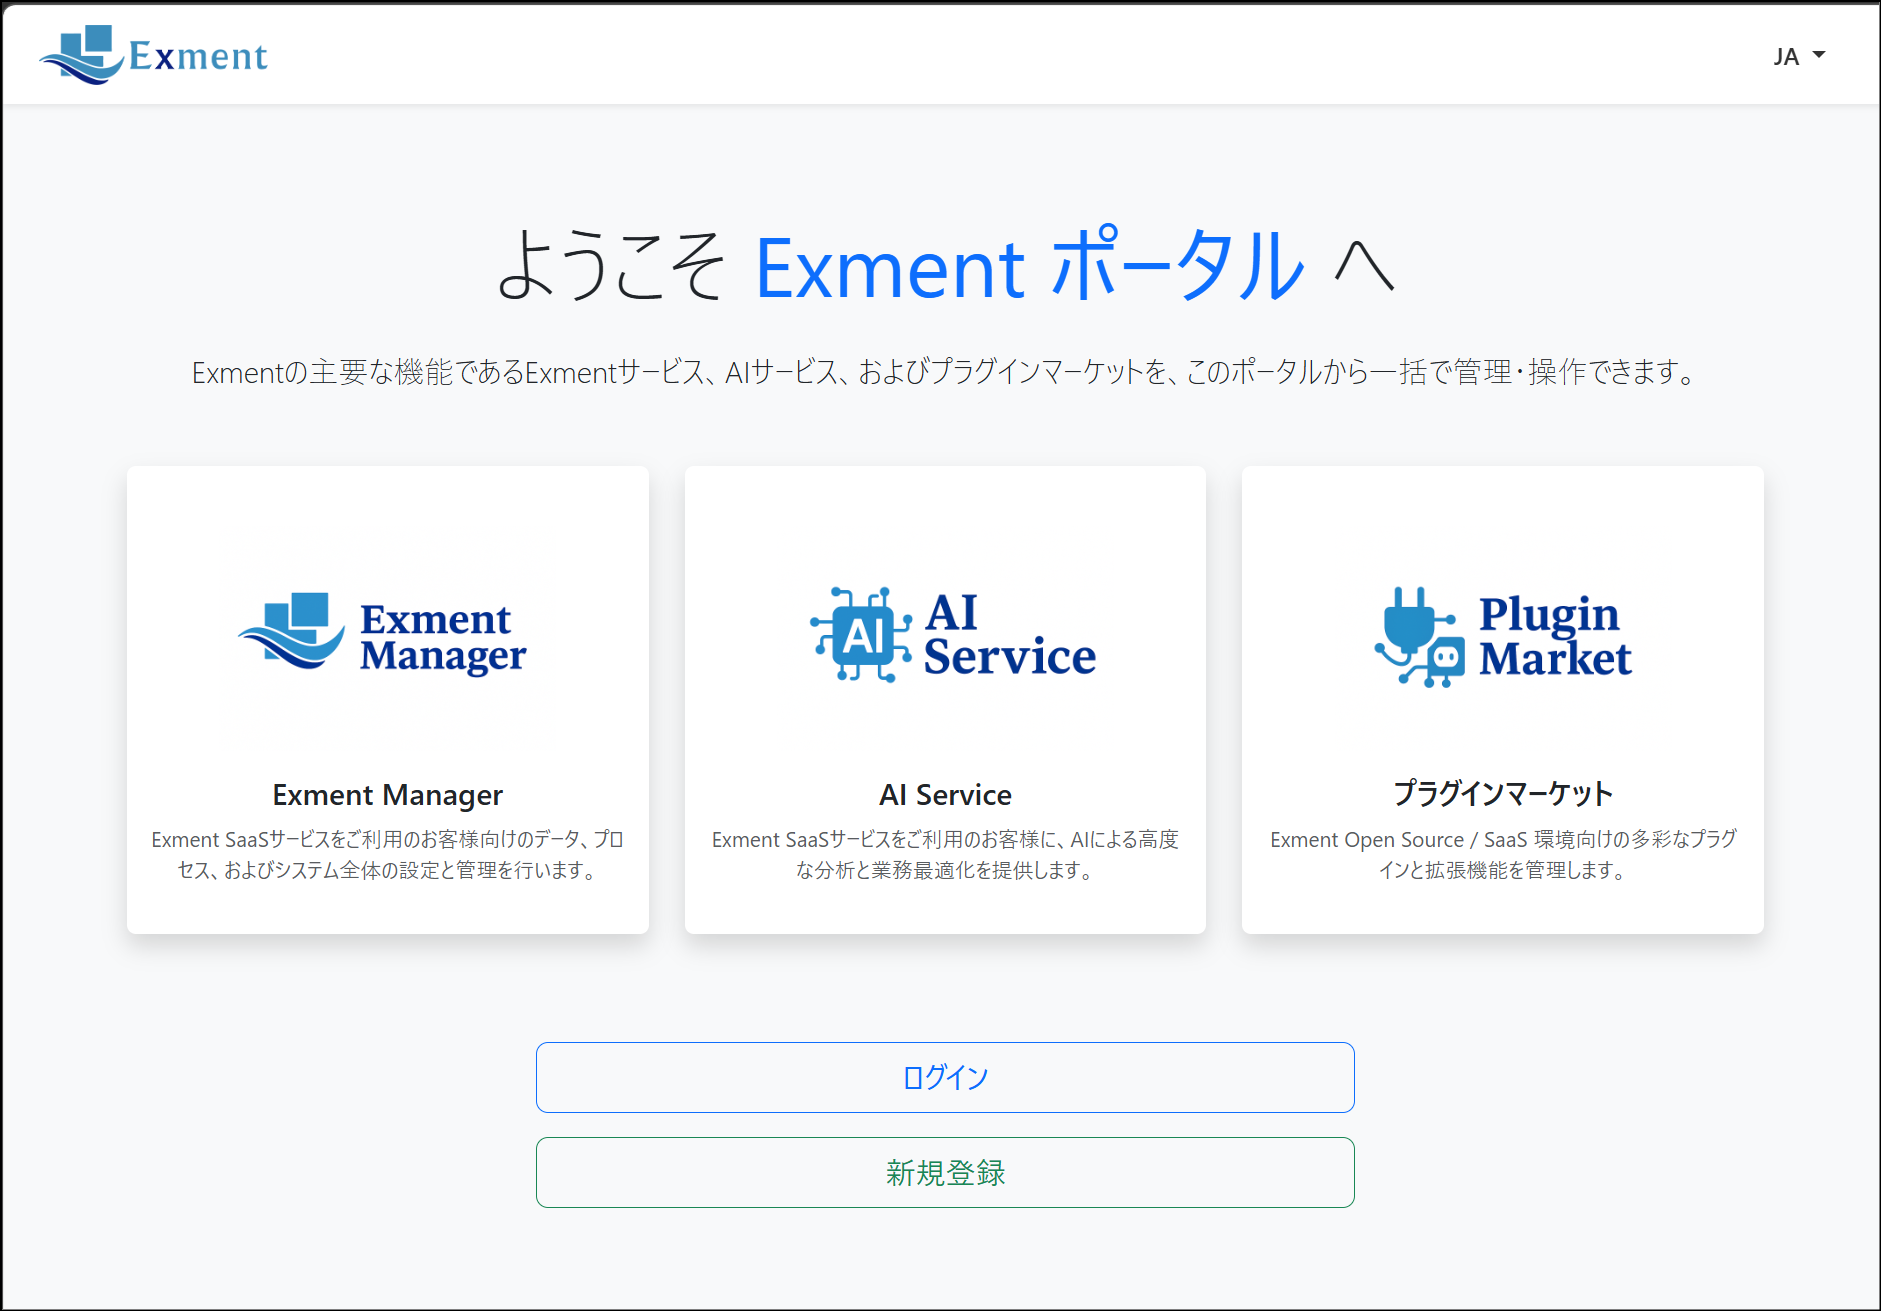
Click [New Registration].
On the [New Registration] screen, select ① “OpenSource User”, enter ② the domain name currently in use, and complete the new registration.
![On the [New Registration] screen, select ① “OpenSource User”, enter ② the domain name currently in use, and complete the new registration.](https://exments.com/manuals/exment-manager/images/sec-1-1-image-02-opensource-user-registration.png)
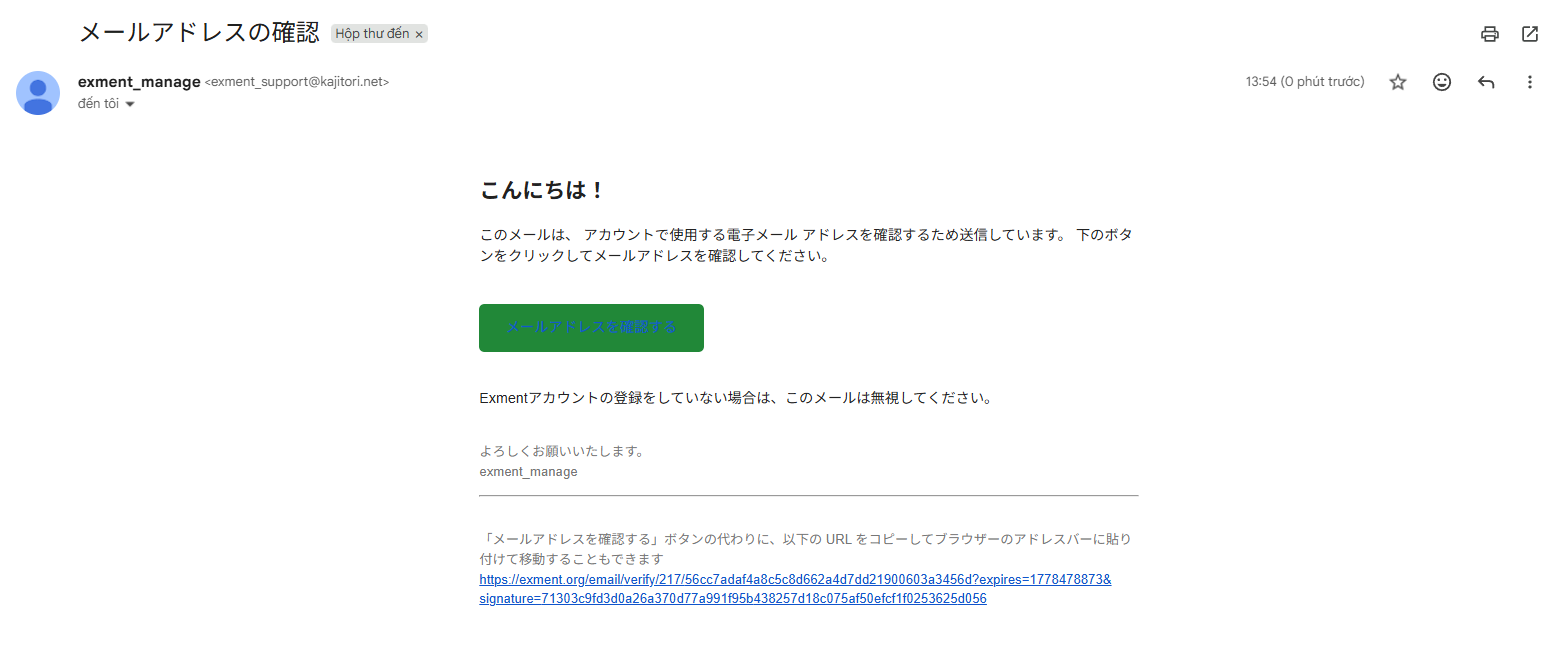
After registration, the system will send a verification email. Open the link in the email and be sure to complete verification.
An email containing the OpenSource token will also be sent.
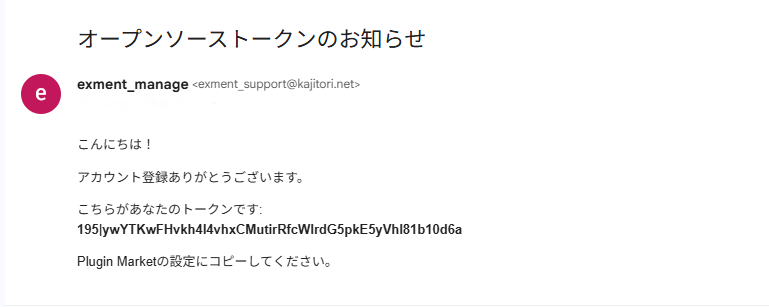
Use the obtained OpenSource token to perform the following settings.
Open the .env file in the directory where Exment is installed with an editor.
Open it.
For a Windows XAMPP environment: C:\xampp\htdocs\exment\.env
For a Linux XAMPP environment: /var/www/exment/.env
Add the following line to the end of the .env file:
AI_SERVER_API_KEY={obtained OpenSource token}
Add it.
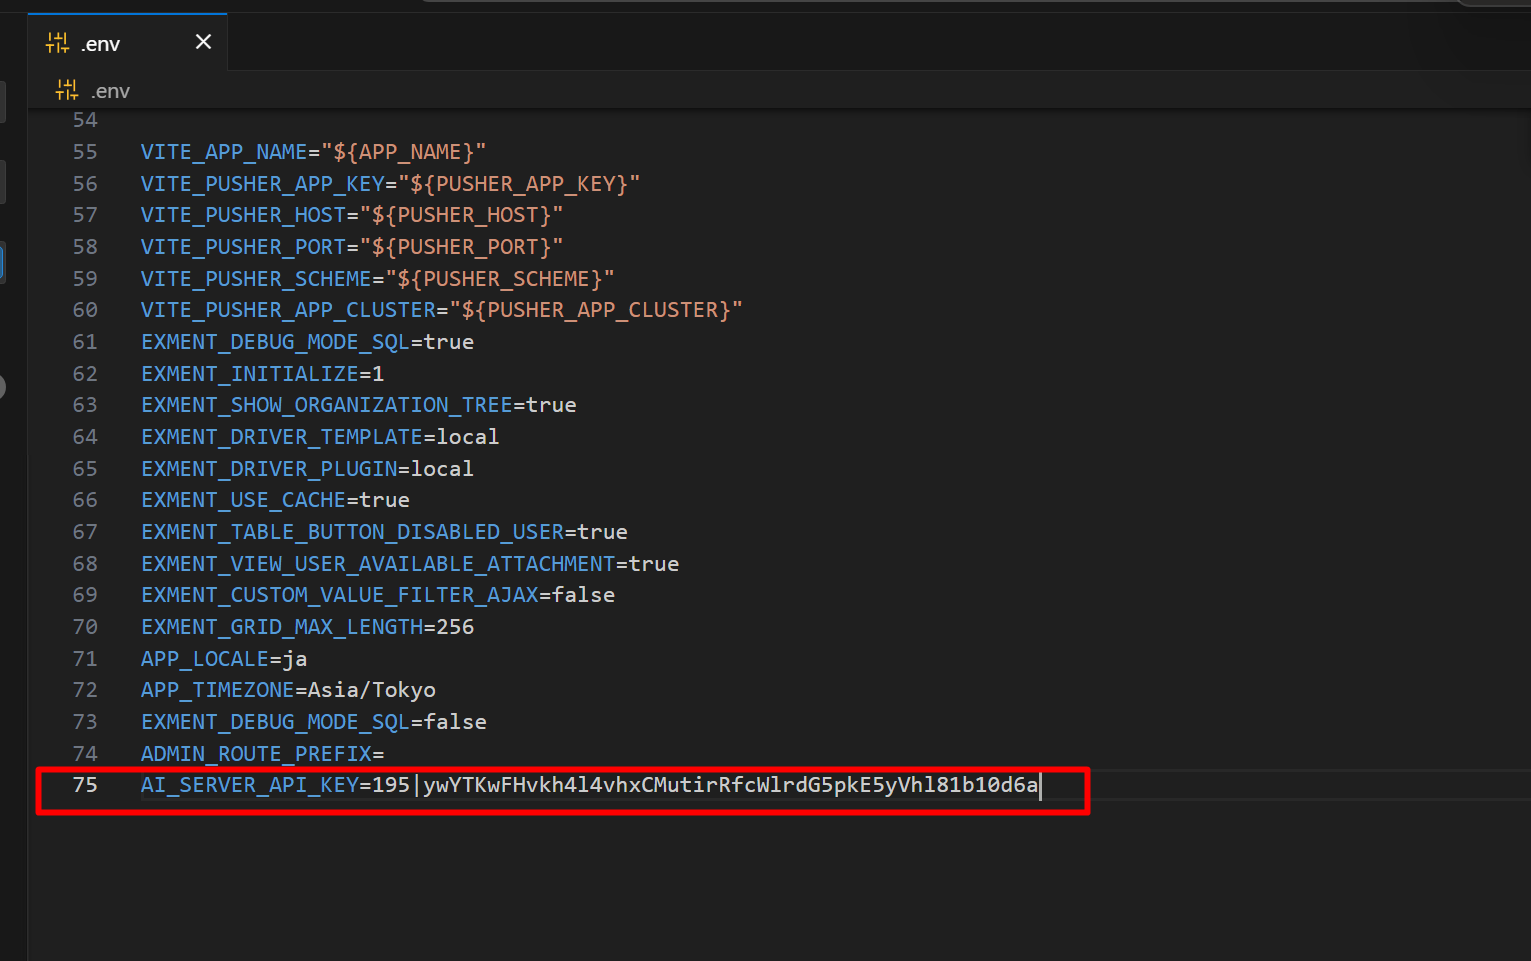
AI_SERVER_API_KEY={obtained OpenSource token}
Add it.
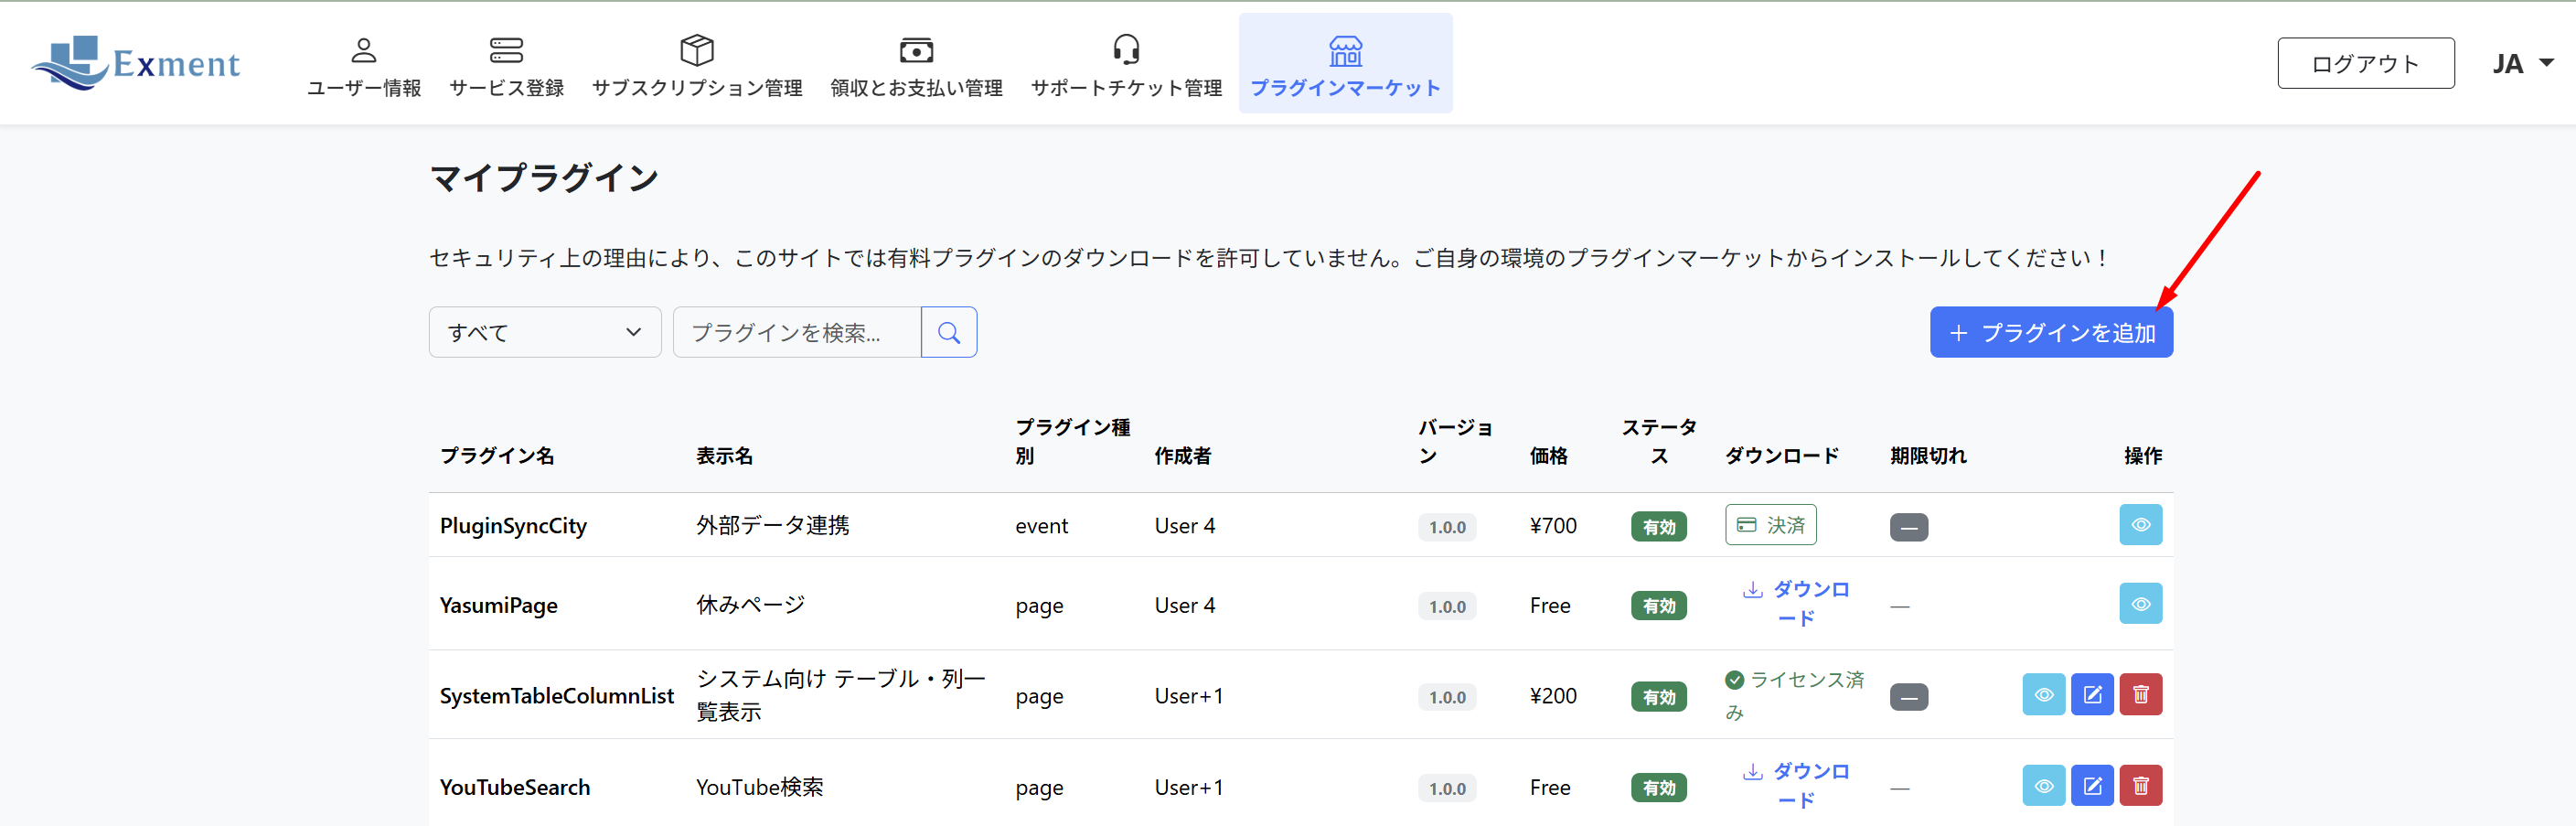
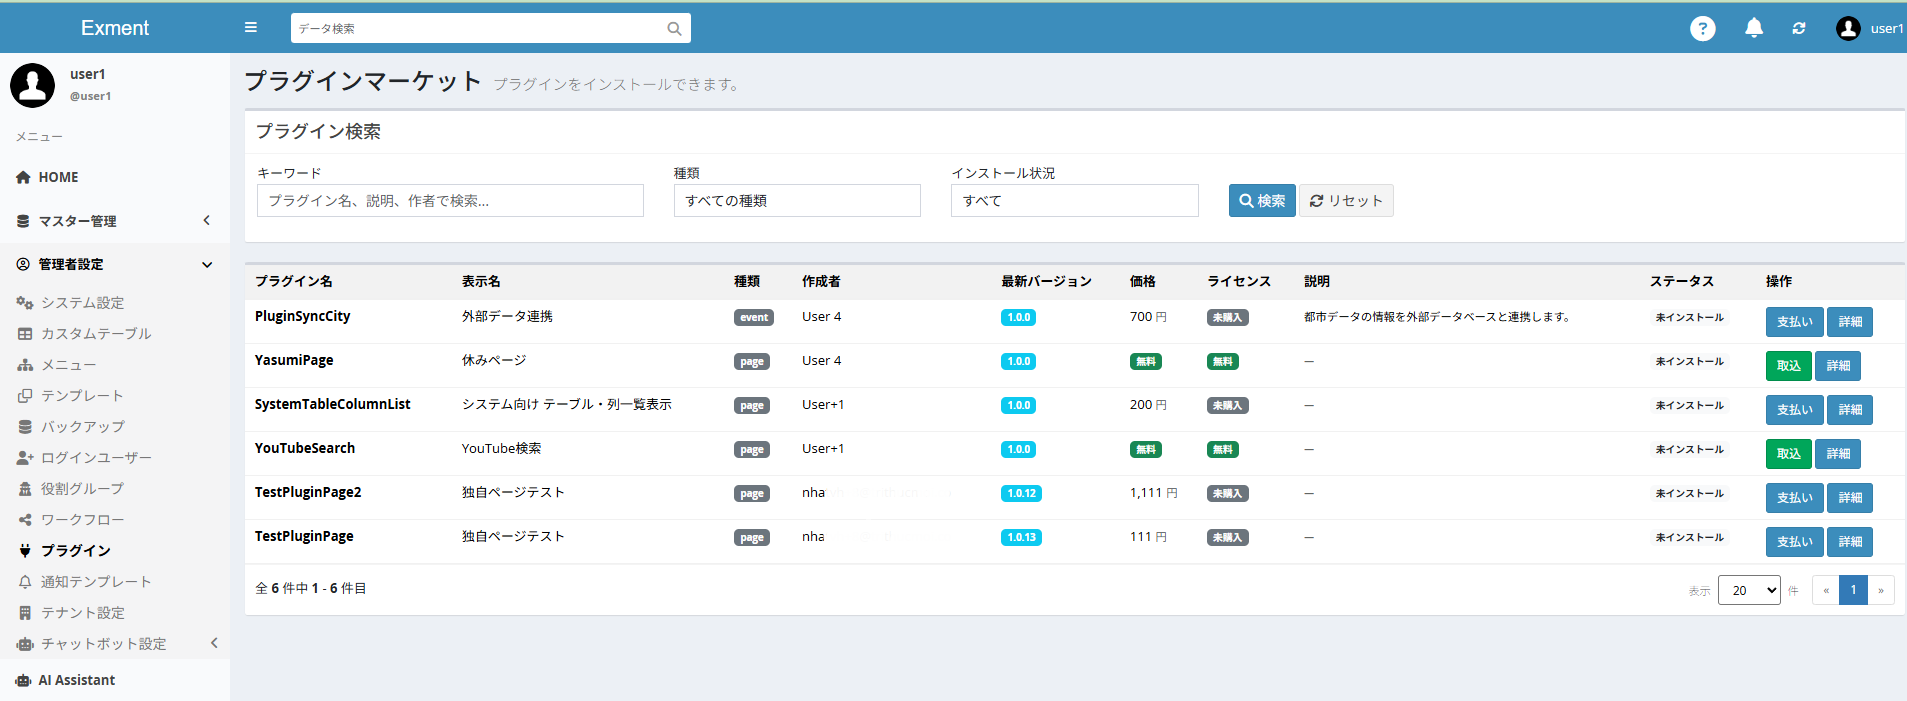
After configuration, the full list of plugins for the domain will be displayed.
1.2 Switching from an OpenSource User to a SaaS User
To switch from an OpenSource user to a SaaS user, log in to Exment Manager as an OpenSource user, then click the [Upgrade Now] button on the “Upgrade to SaaS User” tab under [User Information] and complete the settings.
![To switch from an OpenSource user to a SaaS user, log in to Exment Manager as an OpenSource user, then click the [Upgrade Now] button on the “Upgrade to SaaS User” tab under [User Information] and complete the settings.](https://exments.com/manuals/exment-manager/images/sec-1-2-image-01-saas-user-registration.png)
1.3 How to Create a New Exment SaaS User
When you register an Exment SaaS account in Exment Manager, a cloud environment with the latest version of Exment preinstalled is immediately provided as a trial environment. After trying Exment in the trial environment, you can purchase an Exment SaaS subscription. You can also use various AI services that are highly useful for business operations.
Access the Exment Manager portal site (https://exment.org/).
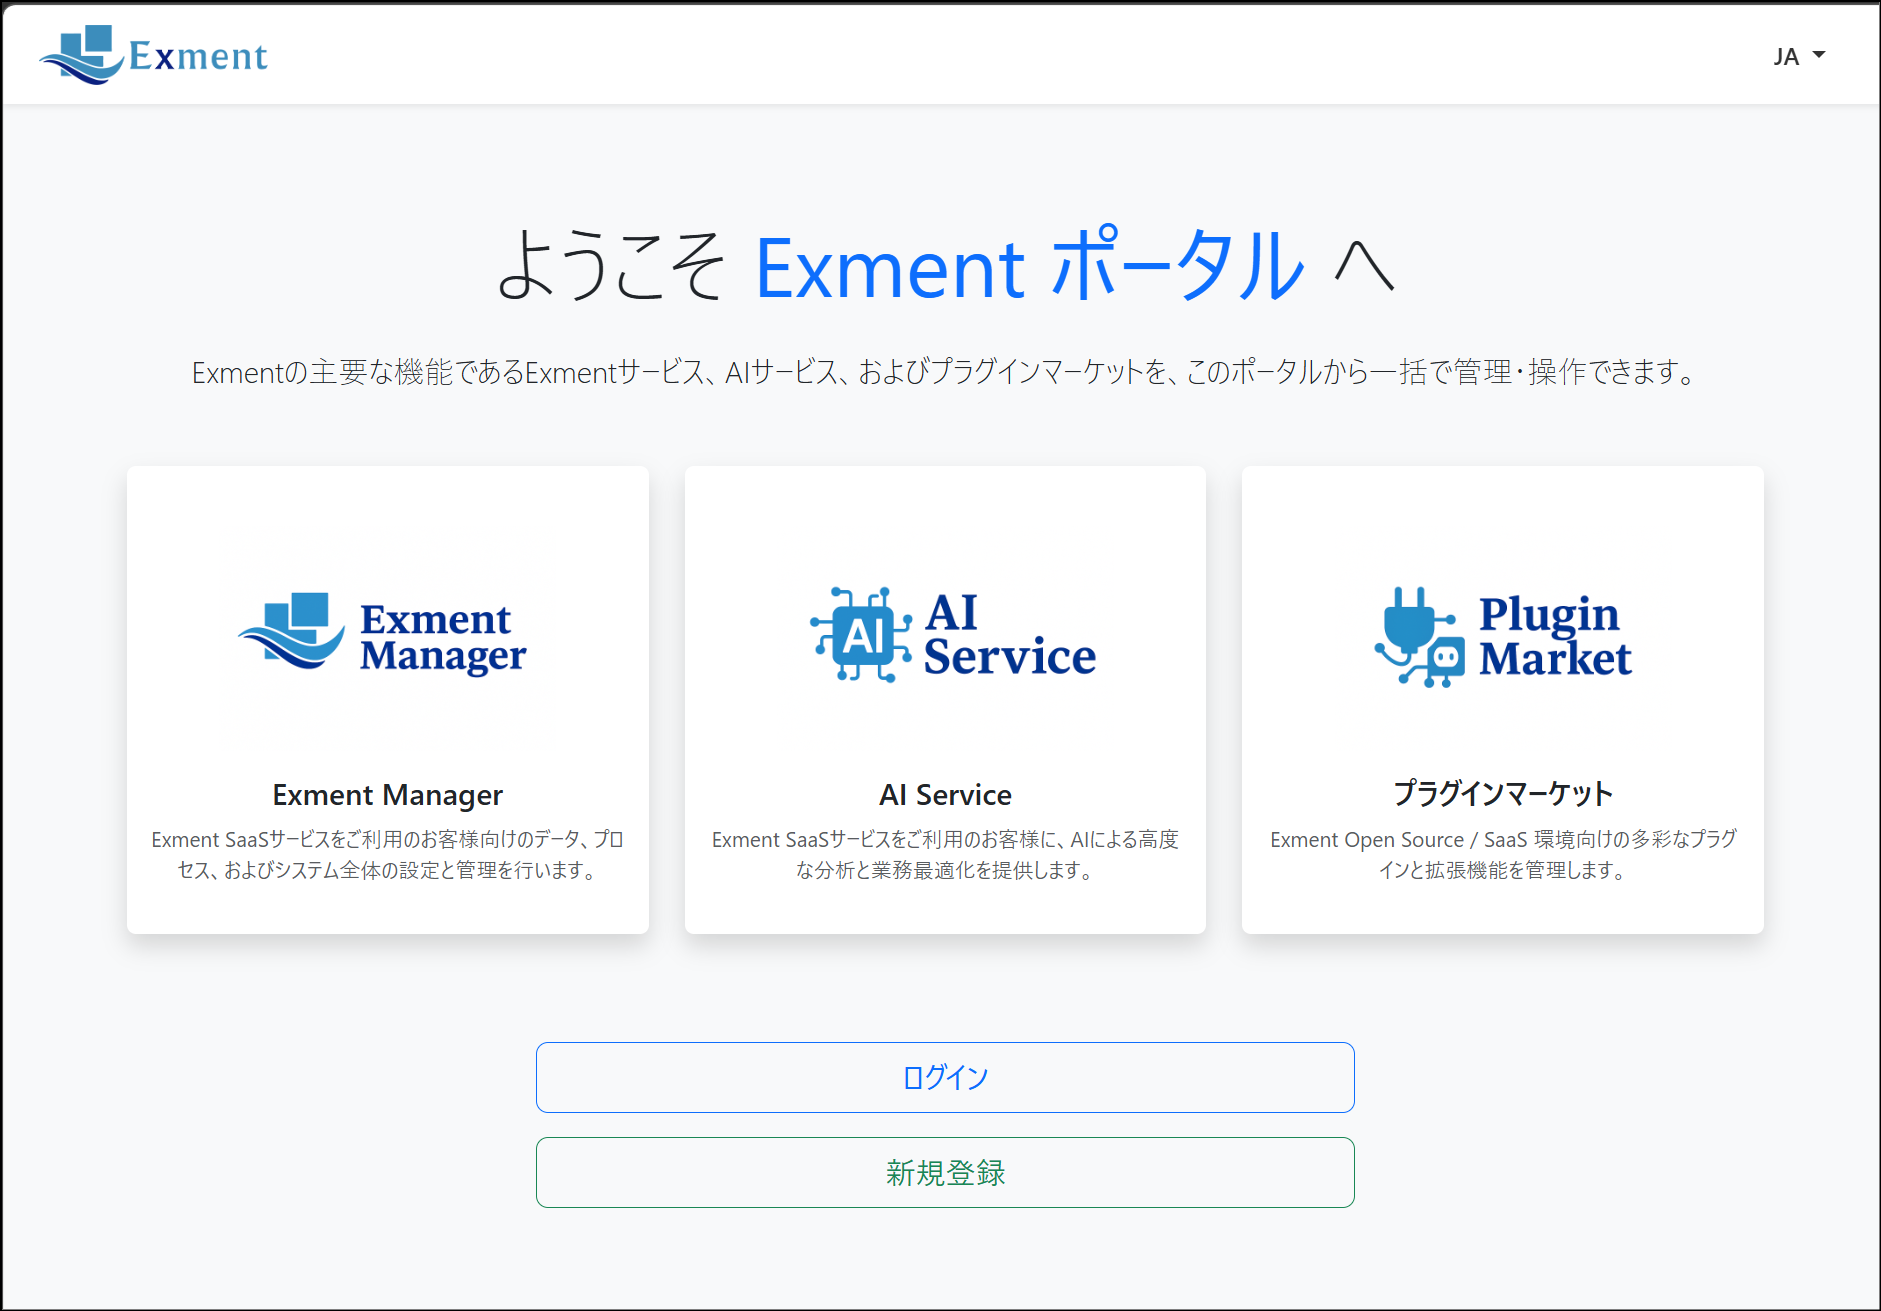
Click [New Registration].
On the [New Registration] screen, select “SaaS User” and complete the new registration.
![On the [New Registration] screen, select “SaaS User” and complete the new registration.](https://exments.com/manuals/exment-manager/images/sec-1-3-image-02-saas-user-registration.png)
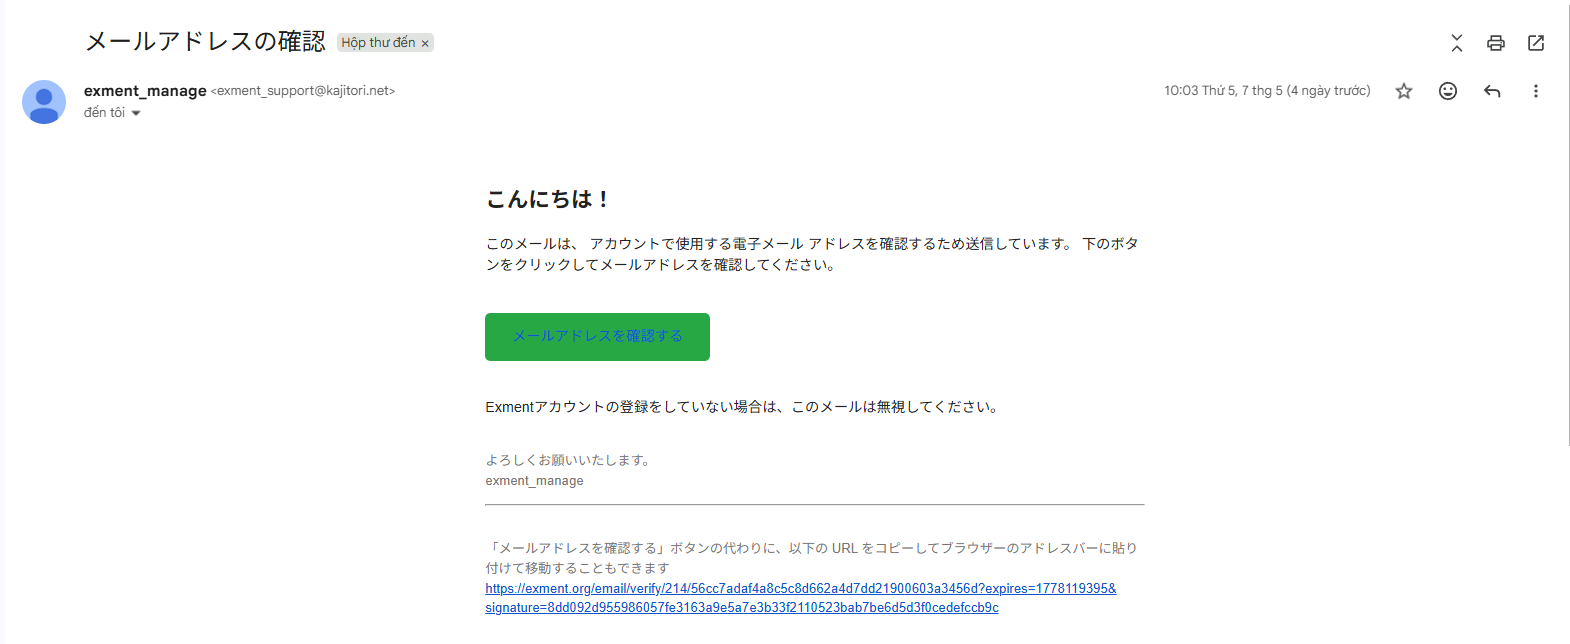
After registration, the system will send a verification email. Open the link in the email and be sure to complete verification.
2. Exment SaaS System Usage Guide
When Exment SaaS account registration is complete, a cloud environment equipped with the latest version of Exment is automatically built. A 3-month free trial plan is also provided, so you can start using Exment immediately.
The 3-month free trial plan is displayed on the Subscription Management screen.
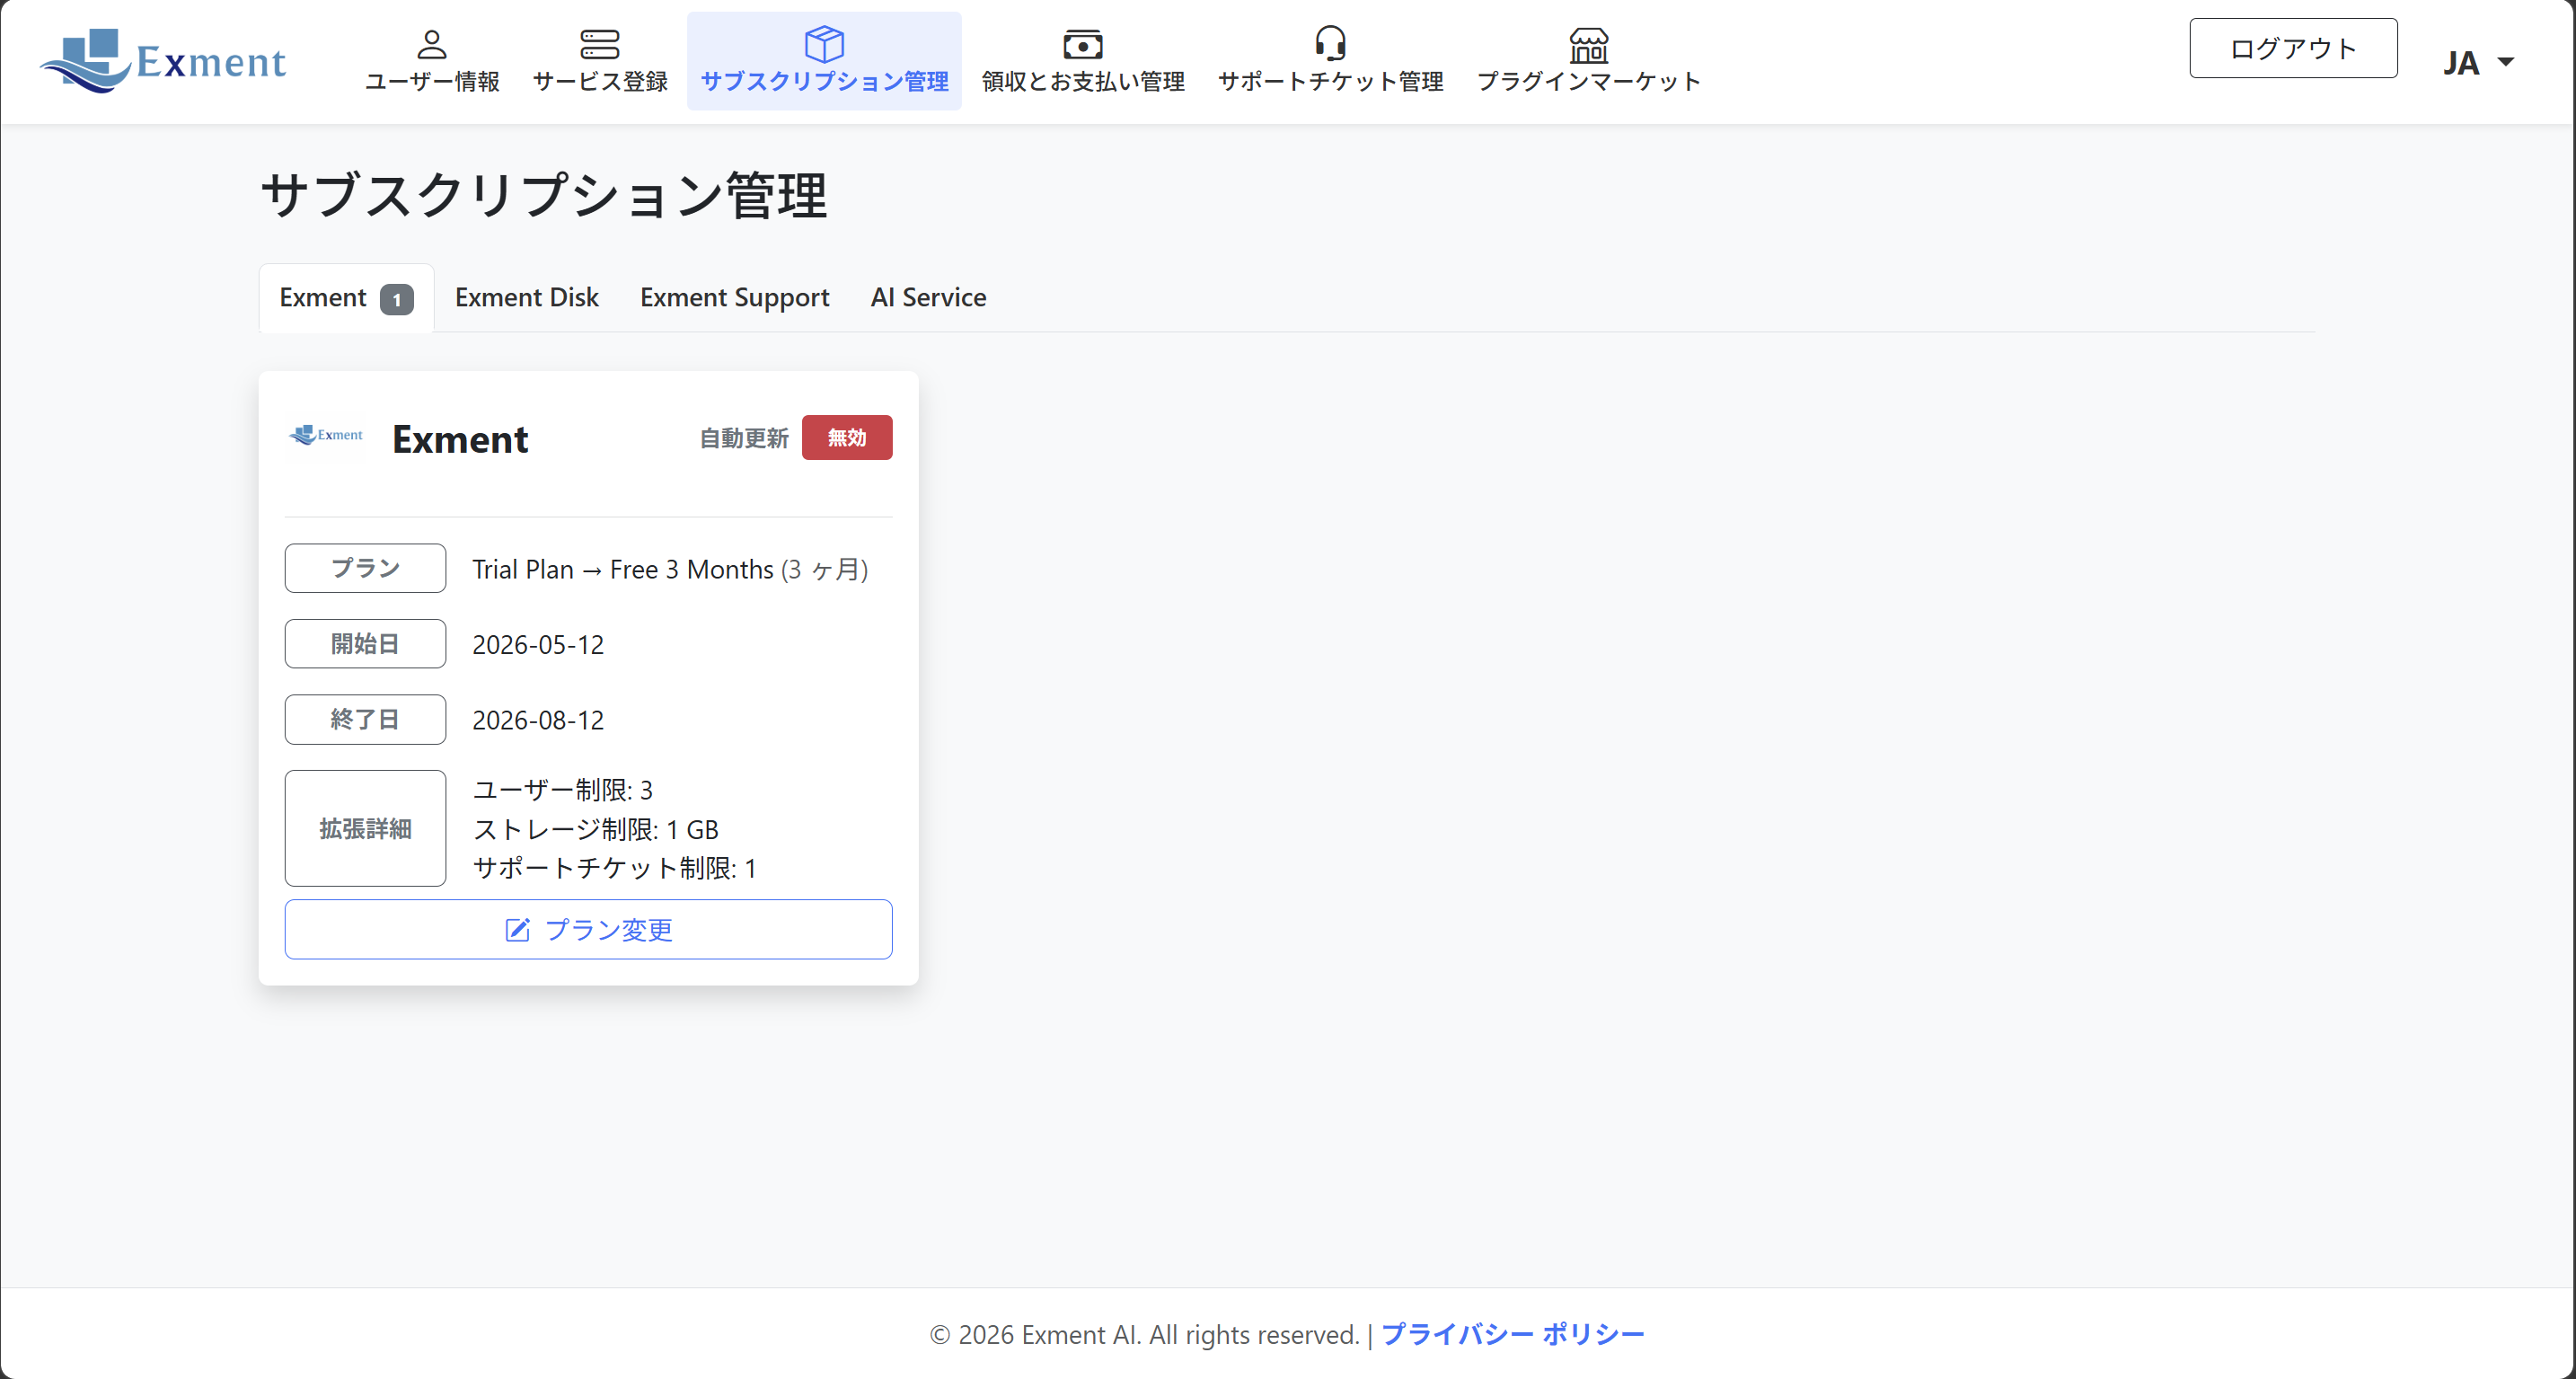
During the trial, you can use your own Exment cloud environment by accessing the domain provided by us.
You can check the domain (URL) used to access Exment and the tenant status on the [Tenant Information] tab of the User Information screen.
When the environment setup is complete, the status changes to Active.
![During the trial, you can use your own Exment cloud environment by accessing the domain provided by us.
You can check the domain (URL) used to access Exment and the tenant status on the [Tenant Information] tab of the User Information screen.
When the environment setup is complete, the status changes to Active.](https://exments.com/manuals/exment-manager/images/sec-2-image-02-tenant-info.png)
You can check the domain (URL) used to access Exment and the tenant status on the [Tenant Information] tab of the User Information screen.
When the environment setup is complete, the status changes to Active.
Access the domain and create an account.
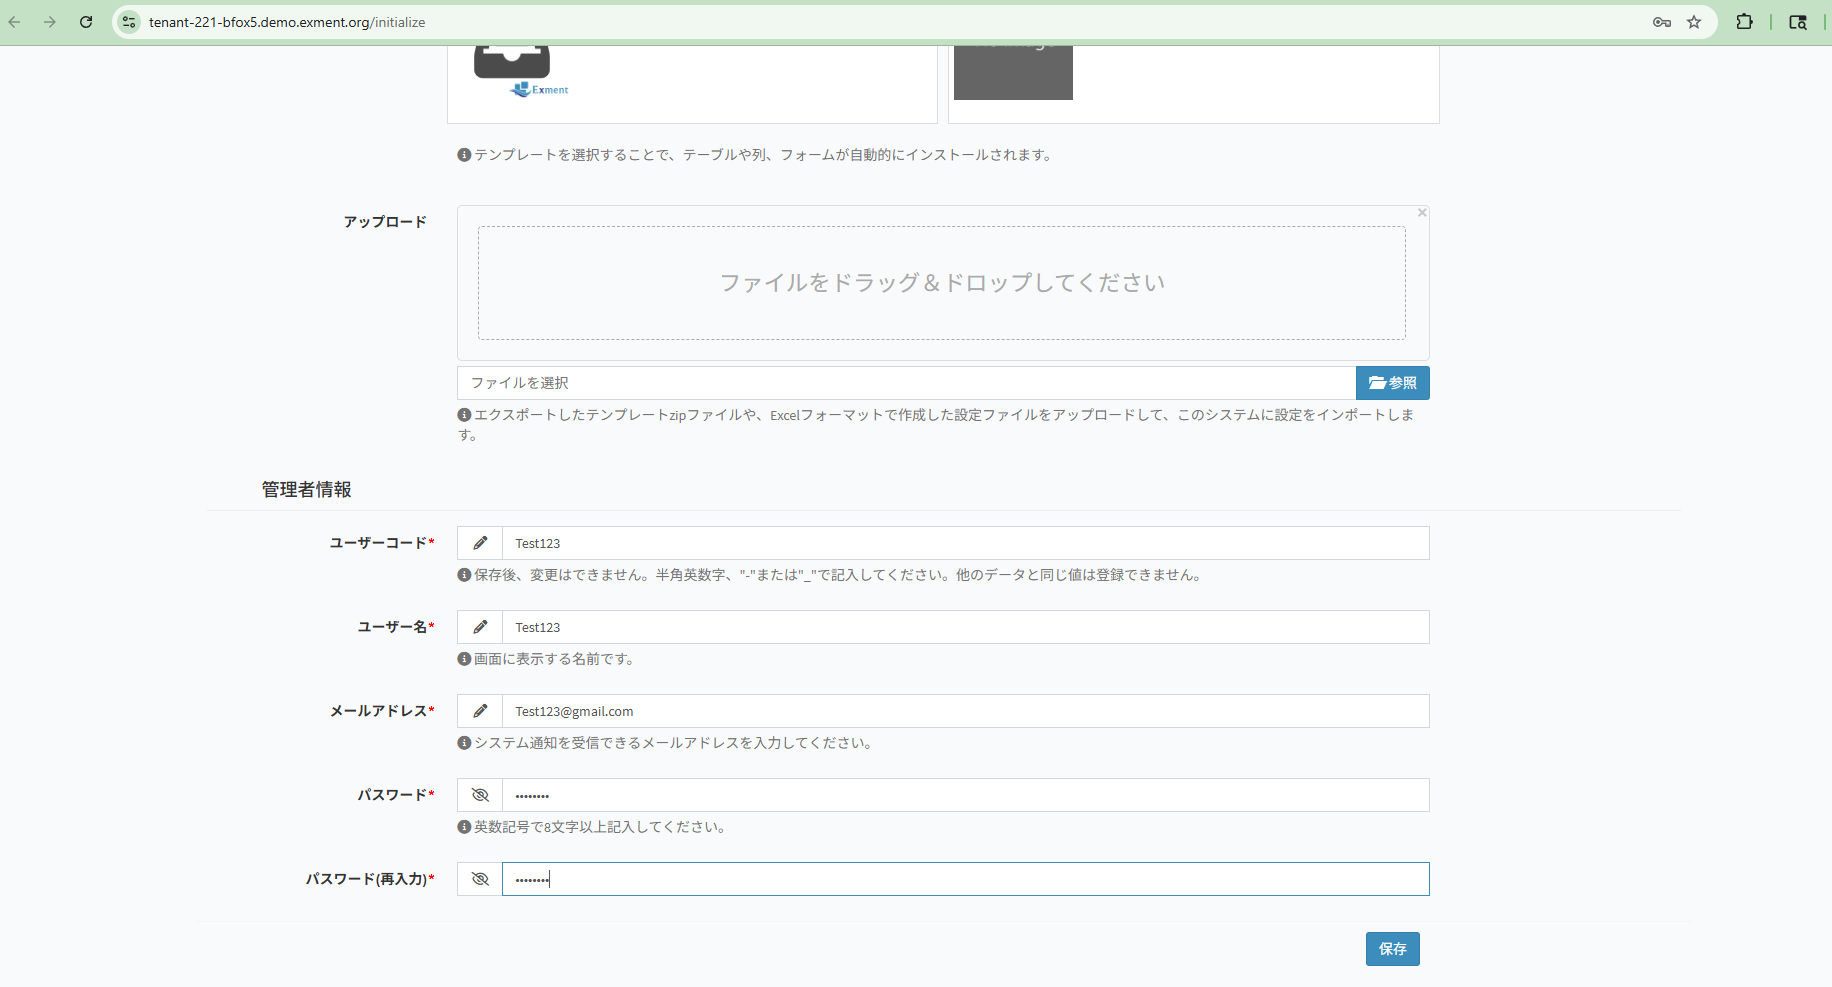
After creating the account, you will be able to use your own Exment cloud environment.
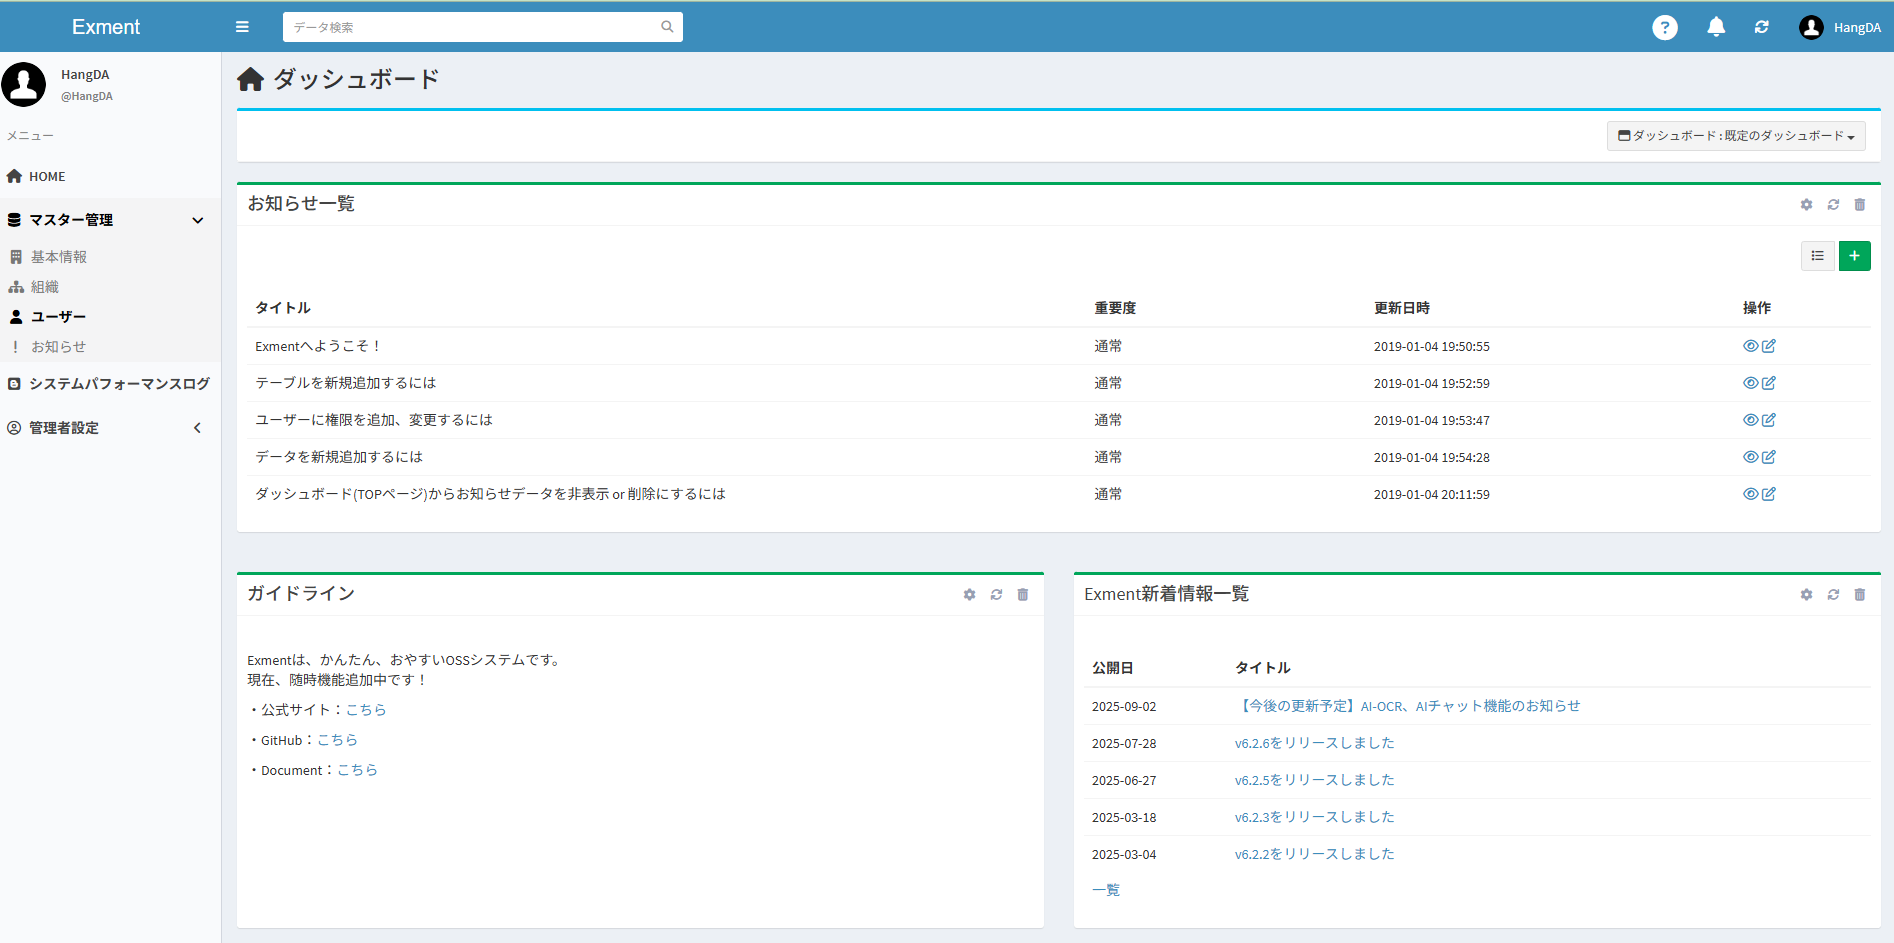
After this, you can create data within the registered storage capacity.
On the Tenant Settings screen, you can check the tenant status, including the current plan, contract period, and usage status.
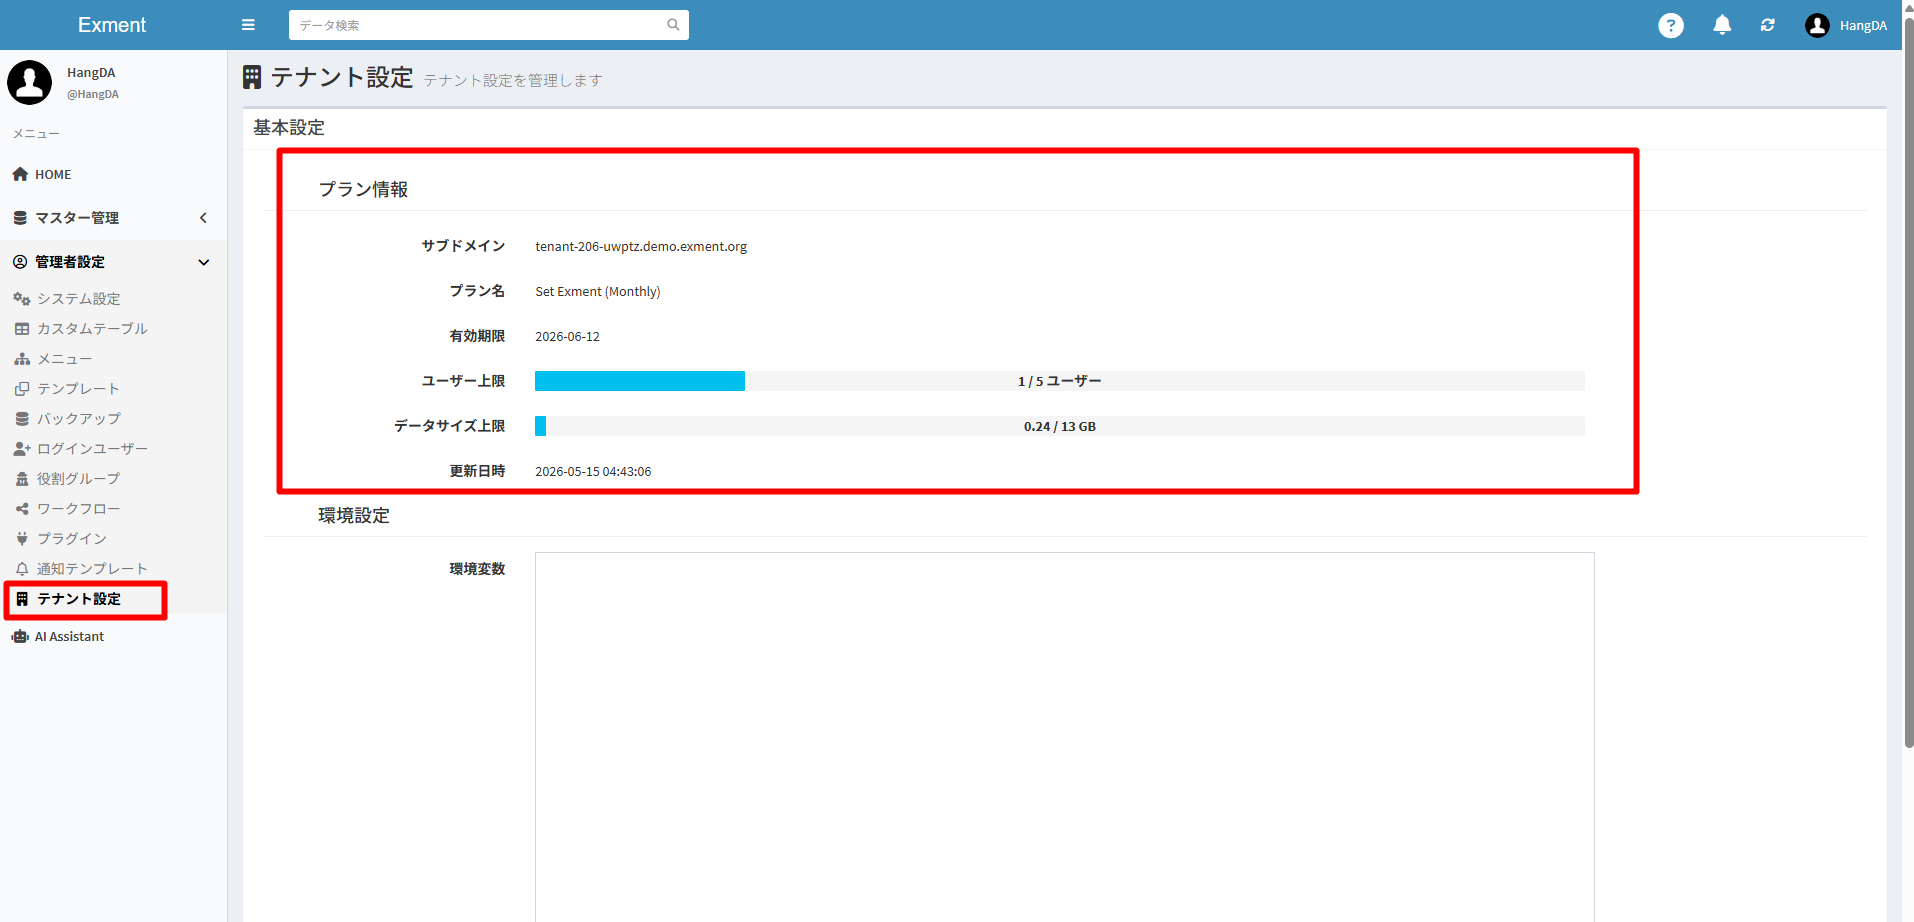
2.1 Service Overview
Exment Manager provides the following services.
- Exment Service
- Exment Disk Service
- Exment Support Service
- AI Service
2.1.1 Exment Service
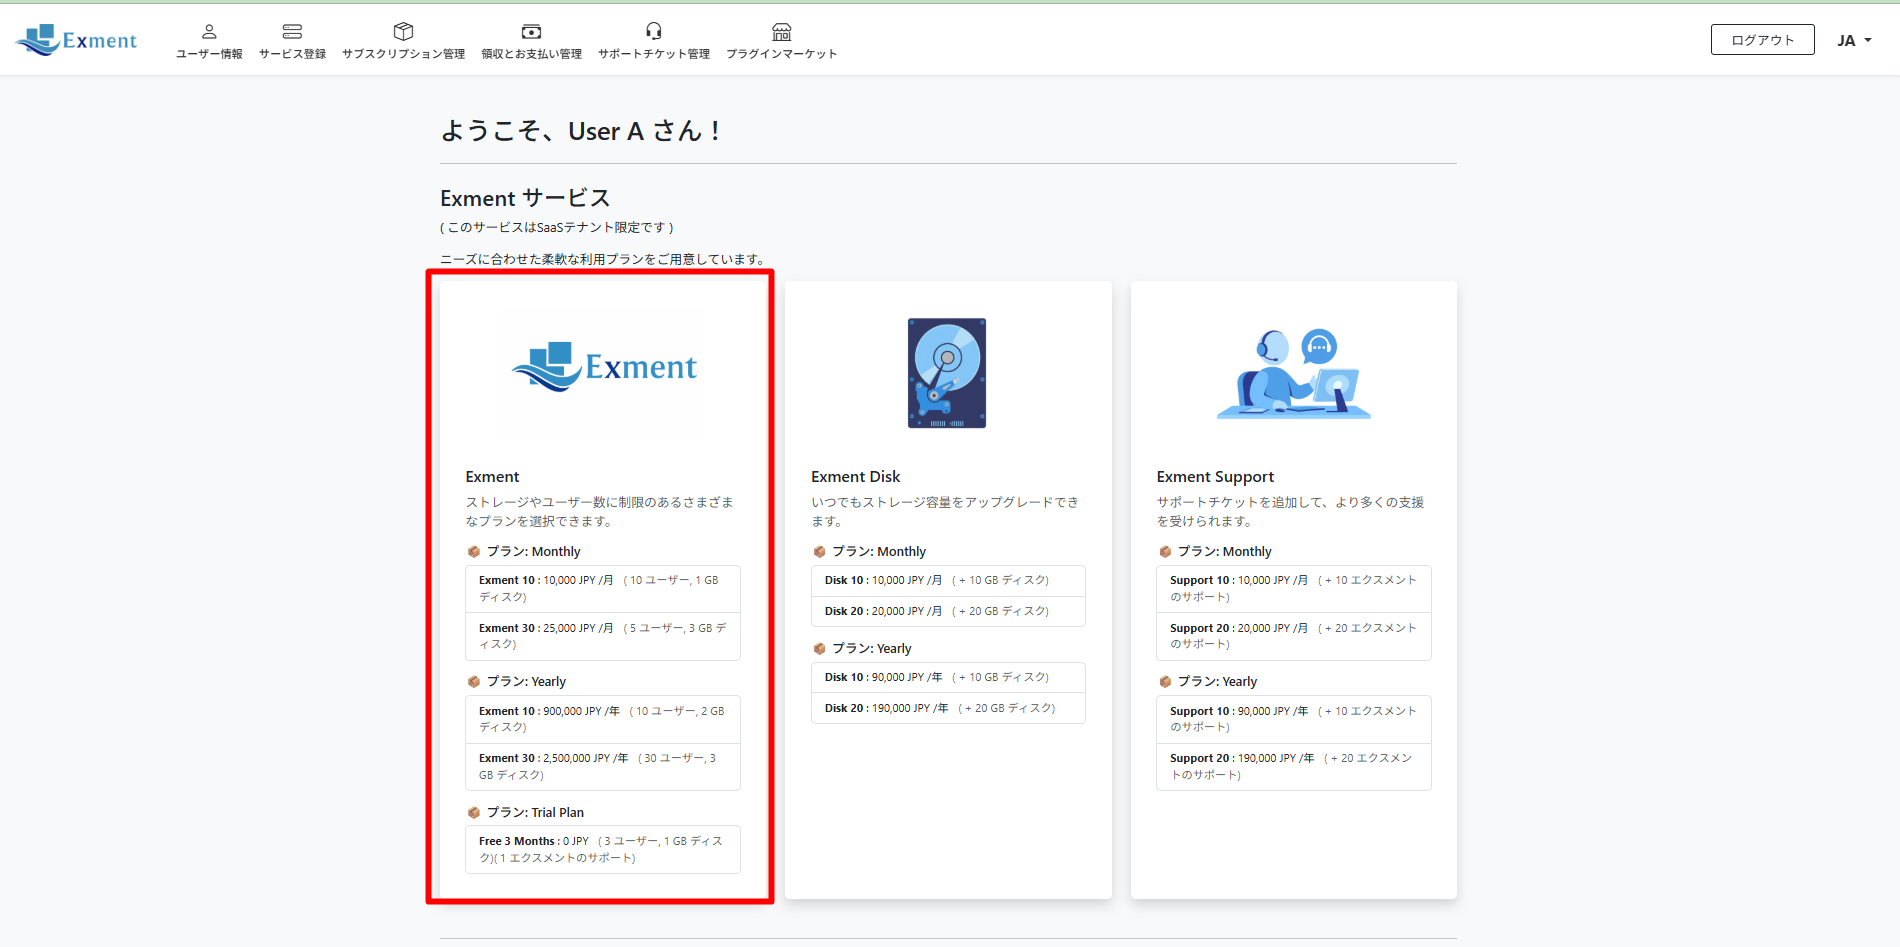
This service provides Exment web database functions as SaaS.
The Exment Service has usage limits based on the purchased plan, such as the number of users that can be created, the maximum available data storage capacity, and the usage period.
This information is displayed on the top screen.
2.1.2 Exment Disk Service
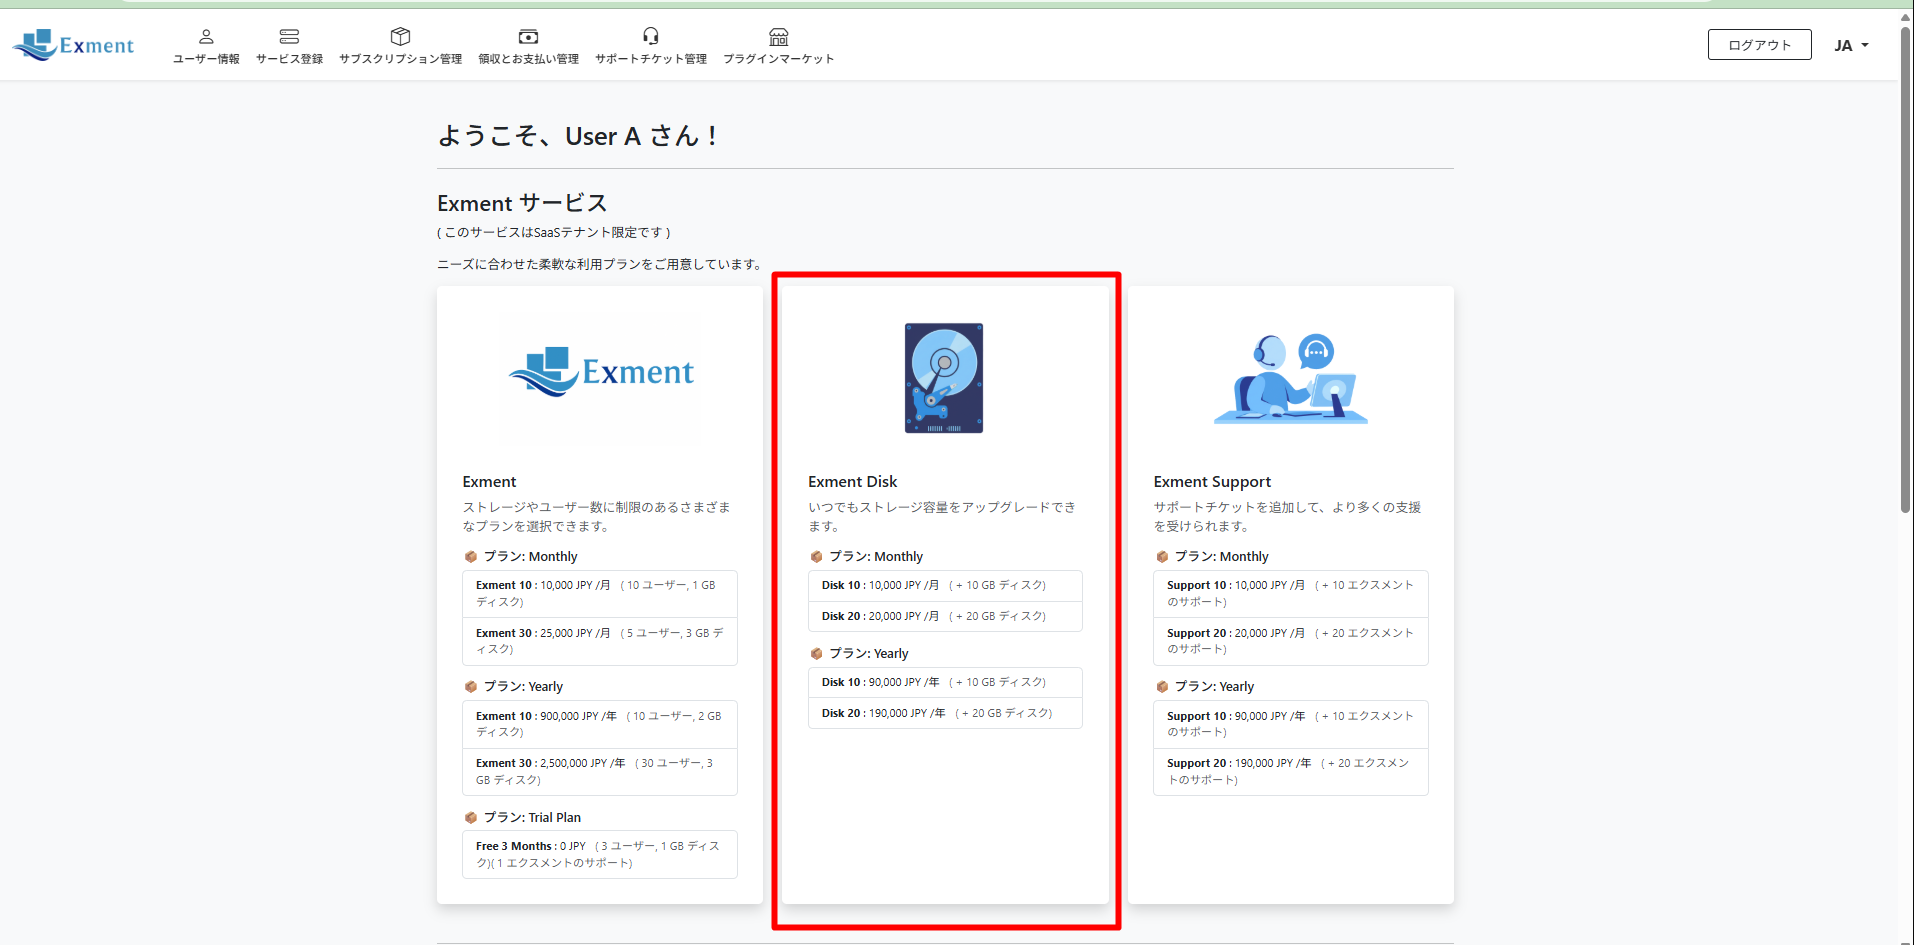
This service lets you add data storage capacity to Exment provided by the Exment Service. By registering multiple plans at the same time, you can increase capacity as needed.
*The storage expansion limit is 100 GB.
If you need more than 100 GB of capacity, please contact us separately.
Exment Disk Service information is displayed on the top screen.
2.1.3 Exment Support Service
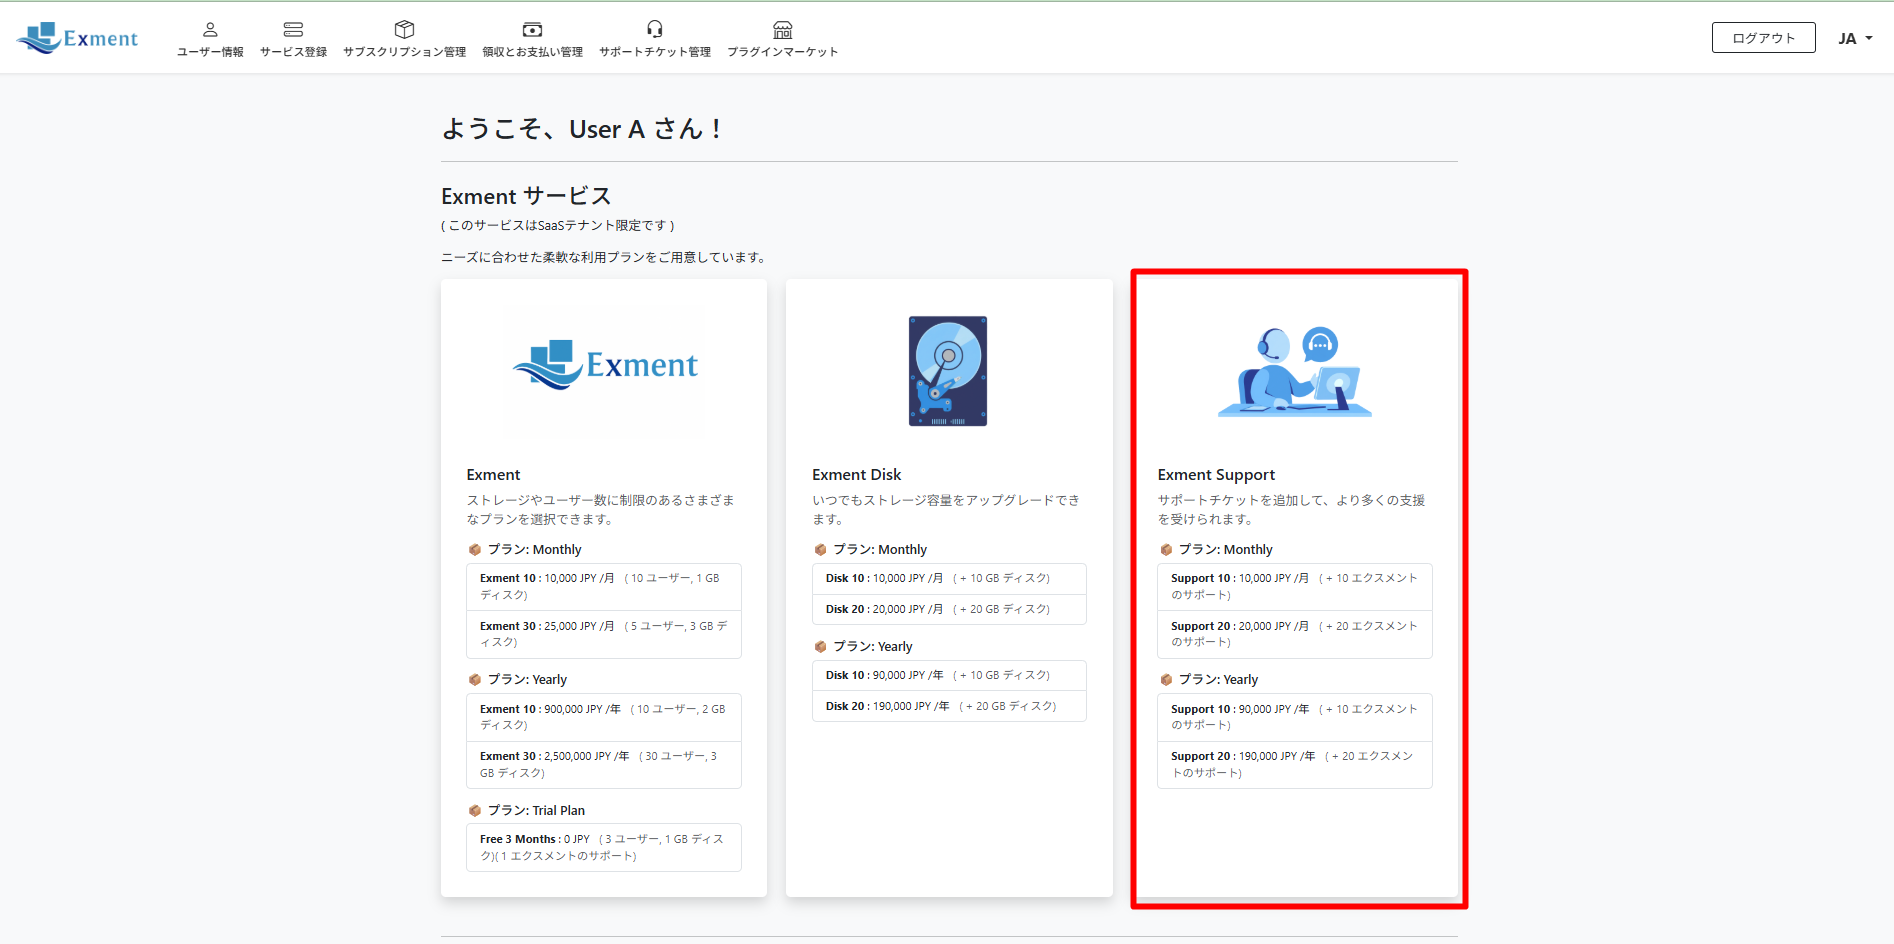
This service is a customer support service that handles various issues related to the Exment system.
After registering for the service, you can create tickets for support requests. When you submit a ticket, we will contact you in order and support you in resolving the issue.
Exment Support Service information is displayed on the top screen.
2.1.4 AI Service - AI-OCR
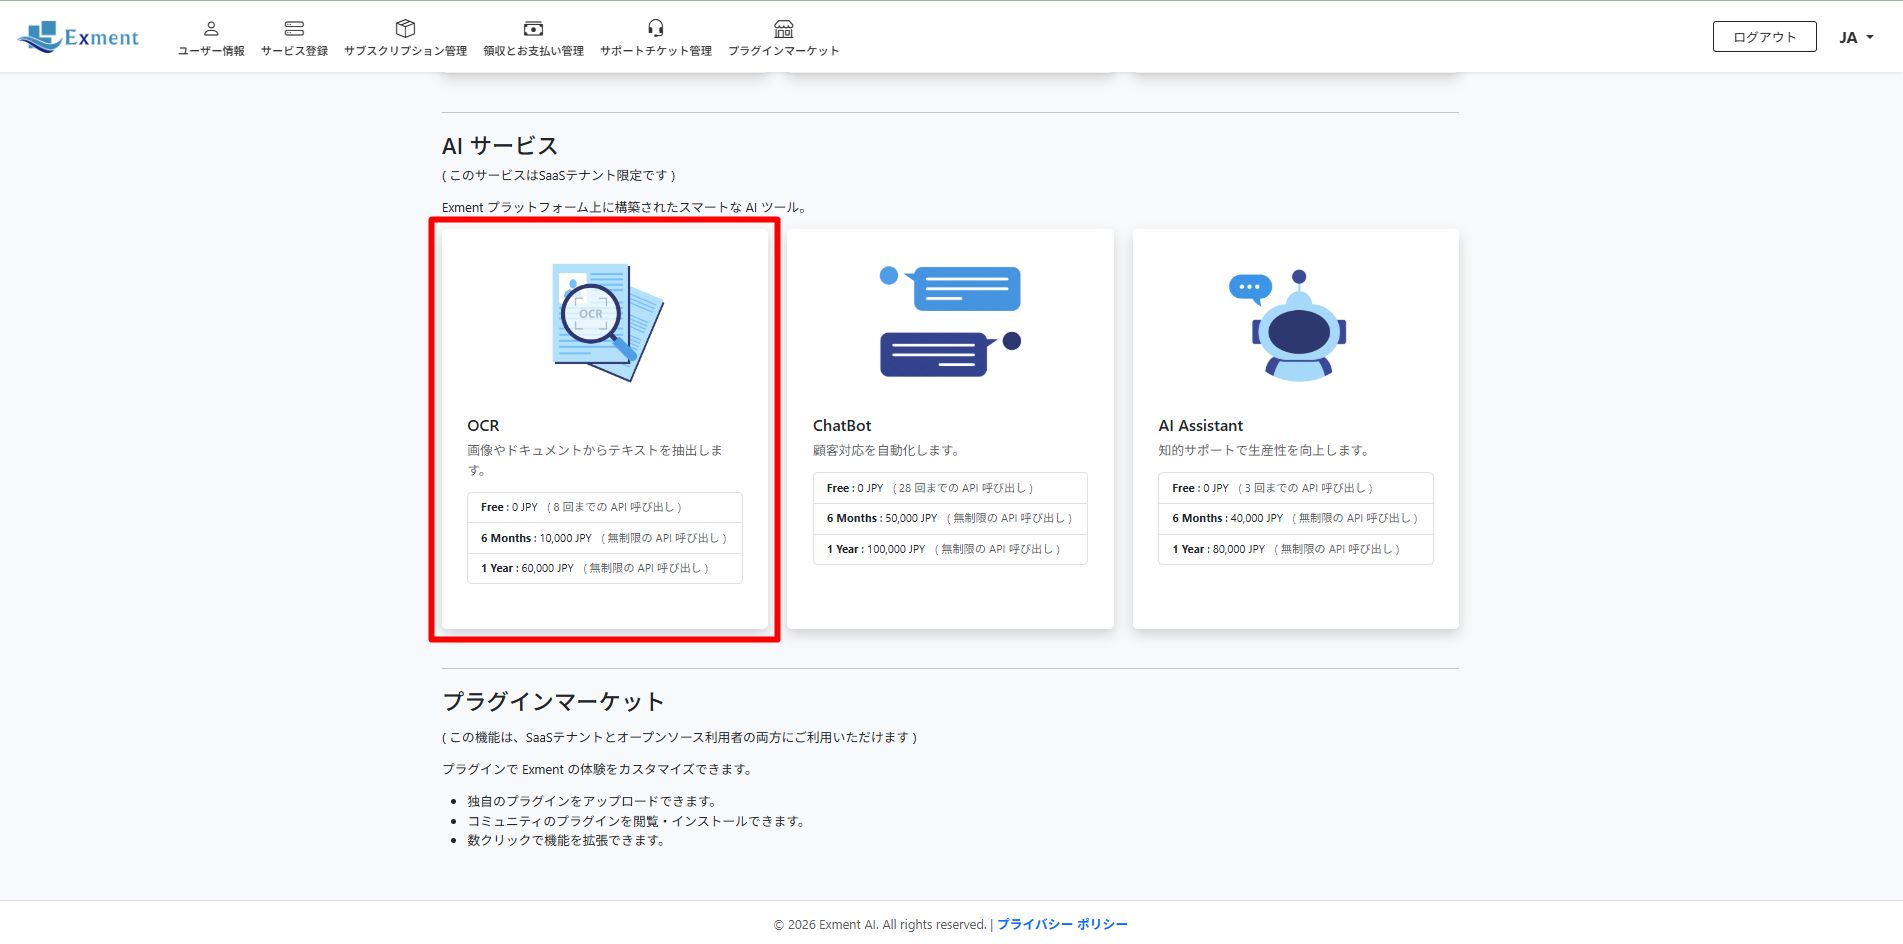
This service uses advanced AI technology to read and process PDF documents and image files, then extract their contents as data that can be saved. This function is integrated with Exment's data table creation function and streamlines data creation and update work by automatically extracting content from images and PDF files.
This service has the following limits depending on the plan.
- Free plan (trial): Monthly usage count is limited.
- Premium plan: There is no monthly usage limit.
*Detailed usage instructions are explained in the next chapter.
AI-OCR service information is displayed on the top screen.
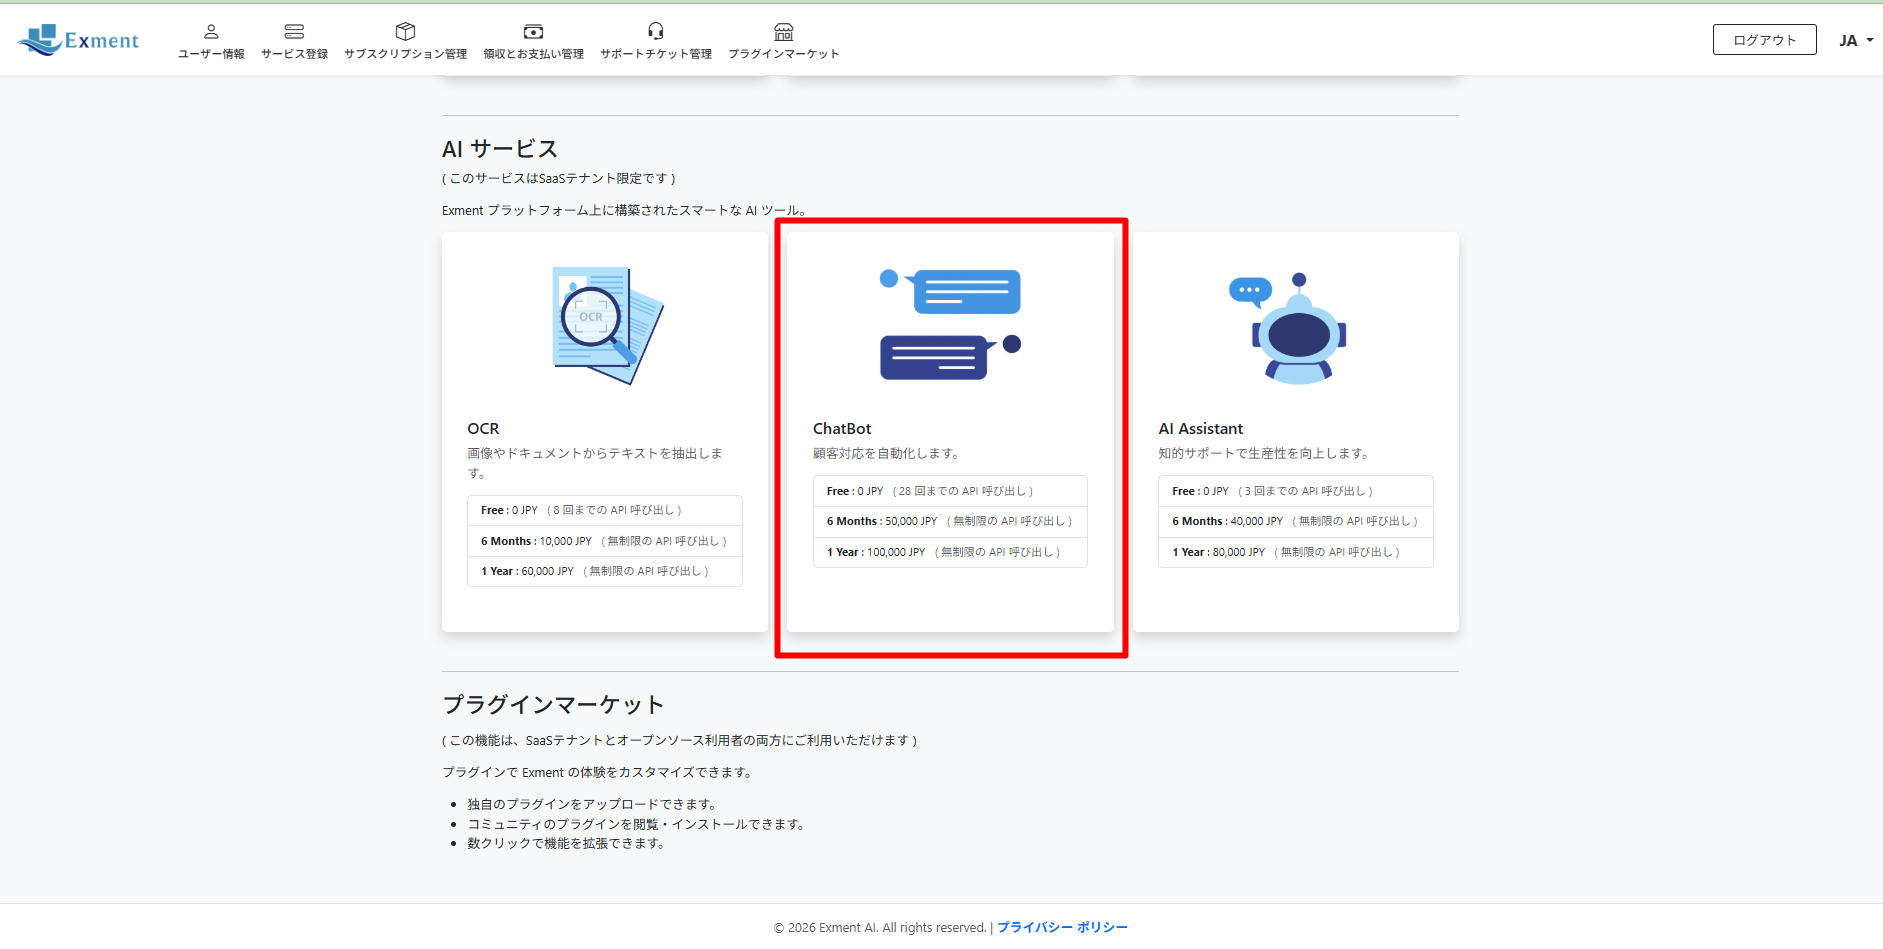
2.1.5 AI Service - AI ChatBot
This service uses AI technology with strengths in natural language understanding to help improve business efficiency.
Exment Manager provides the following two modes.
- RAG Mode:
RAG Mode is an AI mode that searches and references user-provided documents and knowledge to answer questions. The AI retrieves relevant information and generates answers based on that content.
Additional feature enhancements are planned in the future, and the platform will be developed into a system that can be used flexibly as an organizational knowledge base to make it easier to use. - AI Mode:
AI Mode is an AI mode that uses OpenAI's AI language model to answer questions according to the user's interests. It can be used for various purposes, such as searching external knowledge, collecting information, brainstorming ideas, and casual conversation.
This service has the following limits depending on the plan.
•Free plan (trial): Monthly usage count is limited.
•Premium plan: There is no monthly usage limit.
*Detailed usage instructions are explained in the next chapter.
AI ChatBot service information is displayed on the top screen.
2.1.6 AI Service - AI Assistant
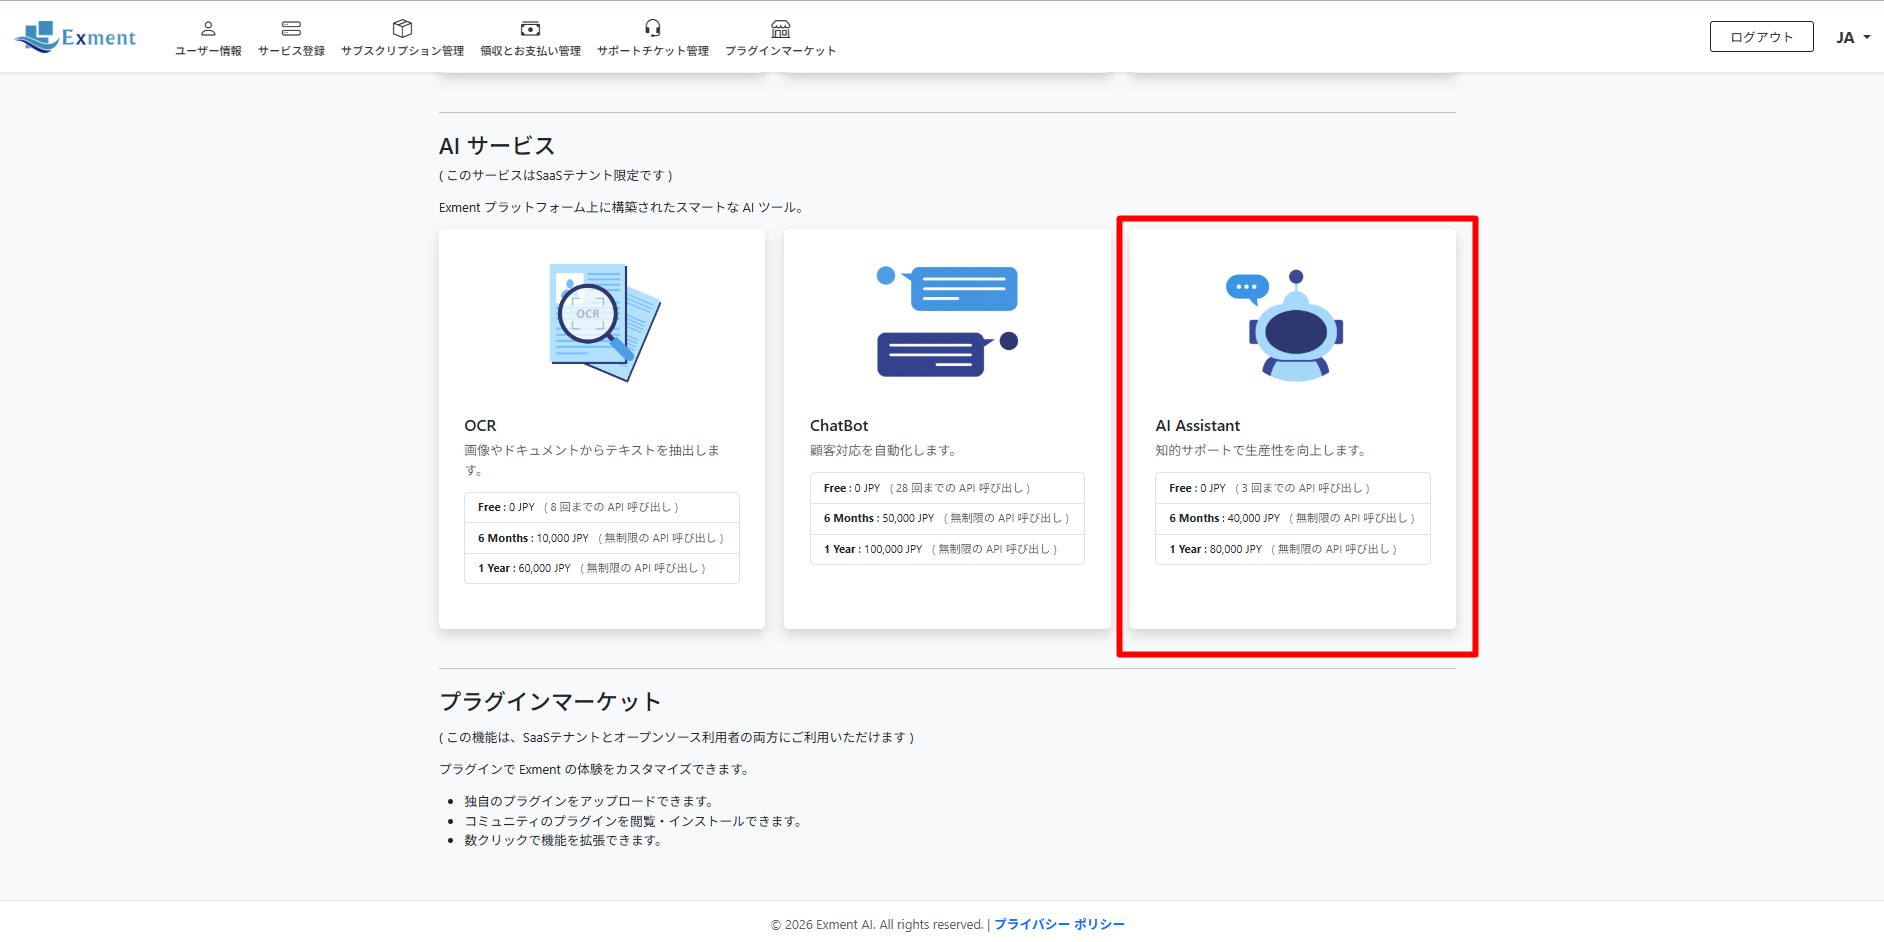
AI Assistant is an AI function that helps users carry out daily work more efficiently. It works in deep integration with the Exment system.
By using AI Assistant, you can create data tables, create workflows, configure notifications (Notify), manage schedules, and perform other tasks more intelligently and intuitively.
This service has the following limits depending on the plan.
- Free plan (trial): Monthly usage count is limited.
- Premium plan: There is no monthly usage limit.
•AI Assistant service information is displayed on the top screen.
2.2 Service Registration Procedure
2.2.1 Service Registration
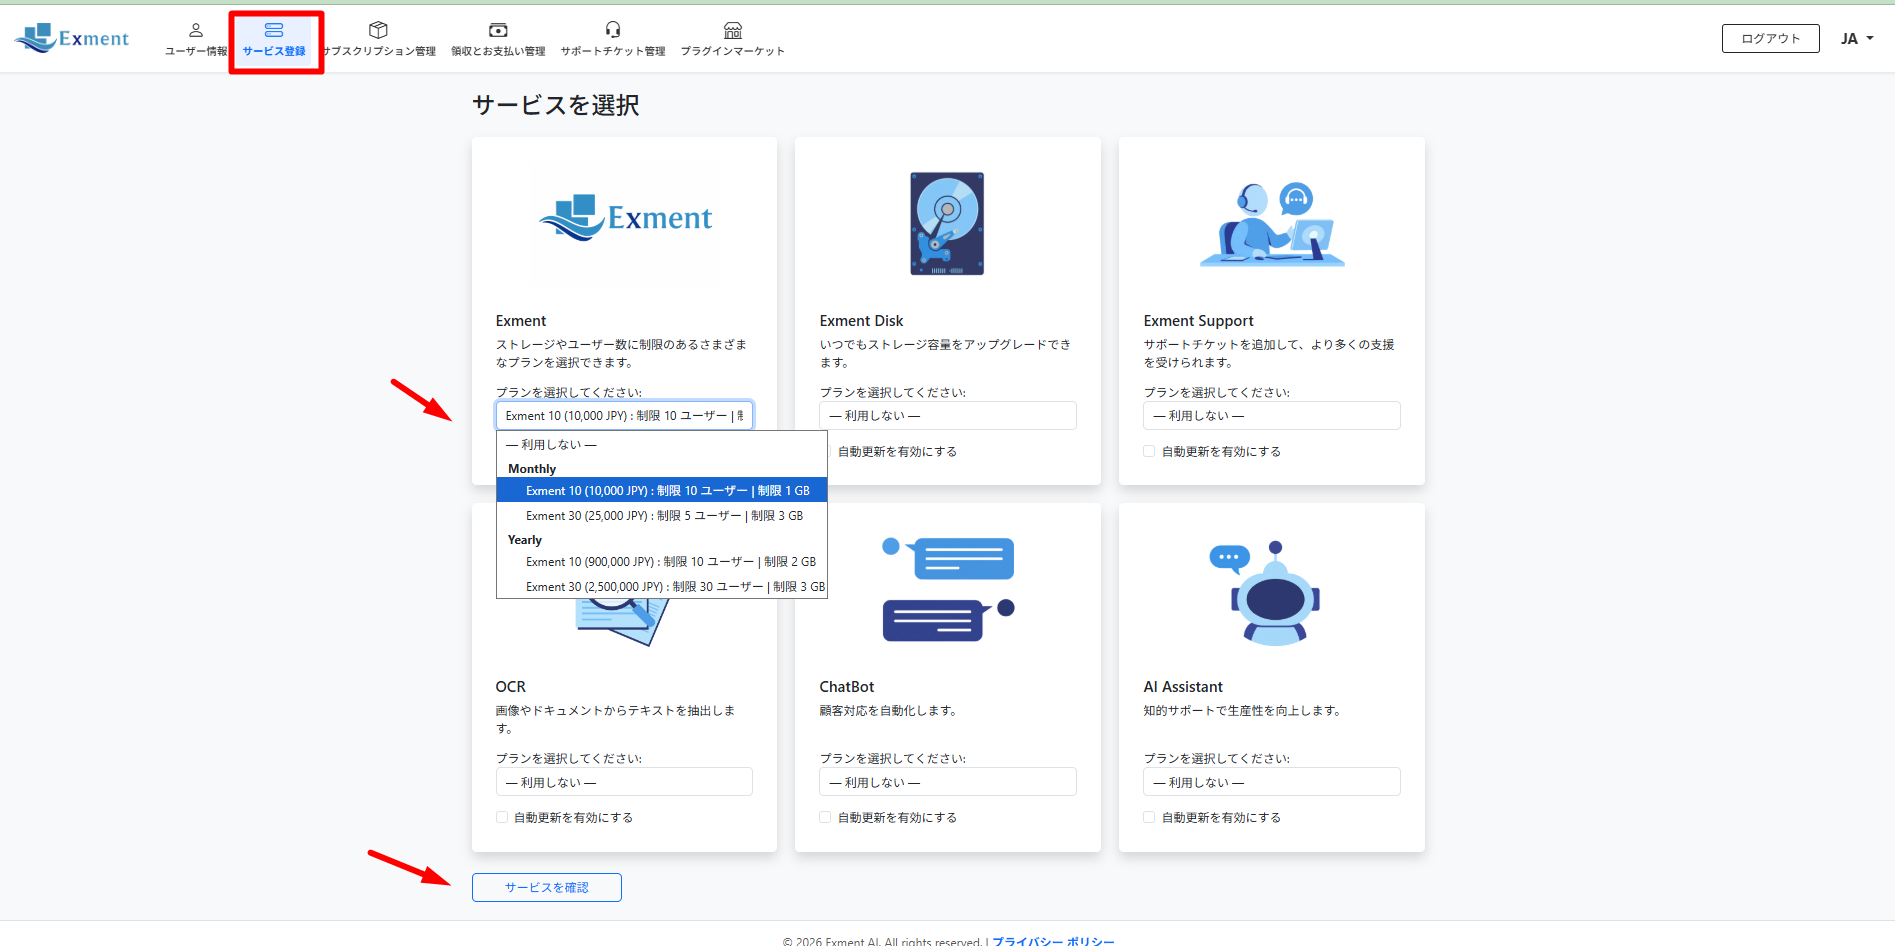
Access the “Select Service” screen, choose the service and plan you want to use, and register.
*[Enable Auto-Renewal]
When the [Enable Auto-Renewal] option is enabled, the service will renew automatically.
On the expiration date of the purchased service, the system automatically renews the contract and charges the registered credit card automatically.
![*[Enable Auto-Renewal]
When the [Enable Auto-Renewal] option is enabled, the service will renew automatically.
On the expiration date of the purchased service, the system automatically renews the contract and charges the registered credit card automatically.](https://exments.com/manuals/exment-manager/images/sec-2-2-1-image-02-auto-renewal.png)
When the [Enable Auto-Renewal] option is enabled, the service will renew automatically.
On the expiration date of the purchased service, the system automatically renews the contract and charges the registered credit card automatically.
2.2.2 Payment Procedure
2.2.2.1 Paying by Credit Card
Open the [Receipts and Payment Management] screen.
Click the [Pay by Card] button.
![Click the [Pay by Card] button.](https://exments.com/manuals/exment-manager/images/sec-2-2-2-1-image-01-card-payment.png)
If you have not registered a credit card yet, click [Add Card].
![If you have not registered a credit card yet, click [Add Card].](https://exments.com/manuals/exment-manager/images/sec-2-2-2-1-image-02-add-card.png)
Enter the card information and save it.
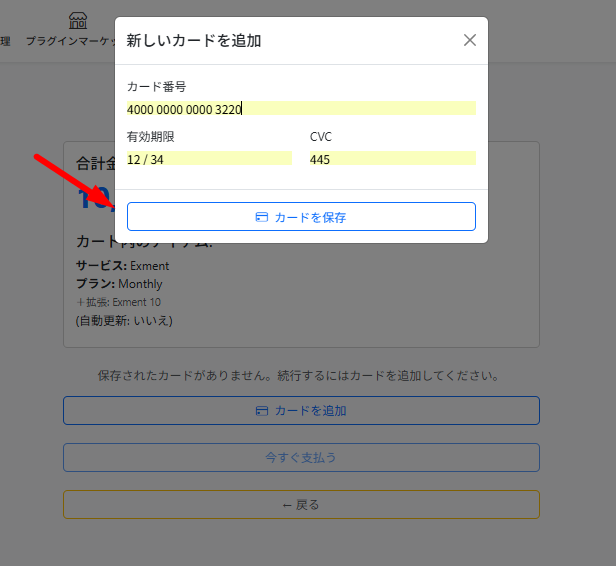
Click [Pay Now] to complete the payment procedure.
![Click [Pay Now] to complete the payment procedure.](https://exments.com/manuals/exment-manager/images/sec-2-2-2-1-image-04-pay-now.png)
2.2.2.2 Manual Payment
Manual payment by bank transfer or cash is also available. However, compared with credit card payment, it may take longer to confirm the payment and apply it to the account.
Open the [Receipts and Payment Management] screen.
Click the [Make Manual Payment] button.
![Click the [Make Manual Payment] button.](https://exments.com/manuals/exment-manager/images/sec-2-2-2-2-image-01-manual-payment.png)
Payment-related information will be sent to the email address registered by the user.
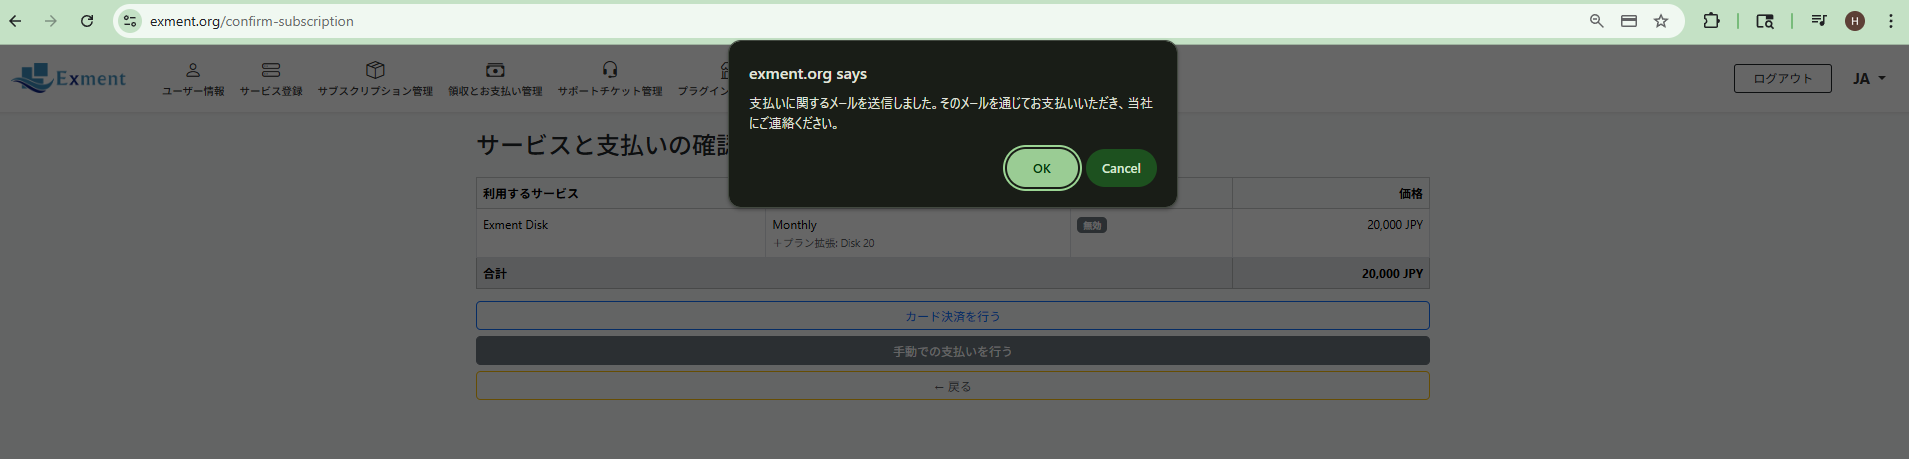
The email contains the information for the registered service.
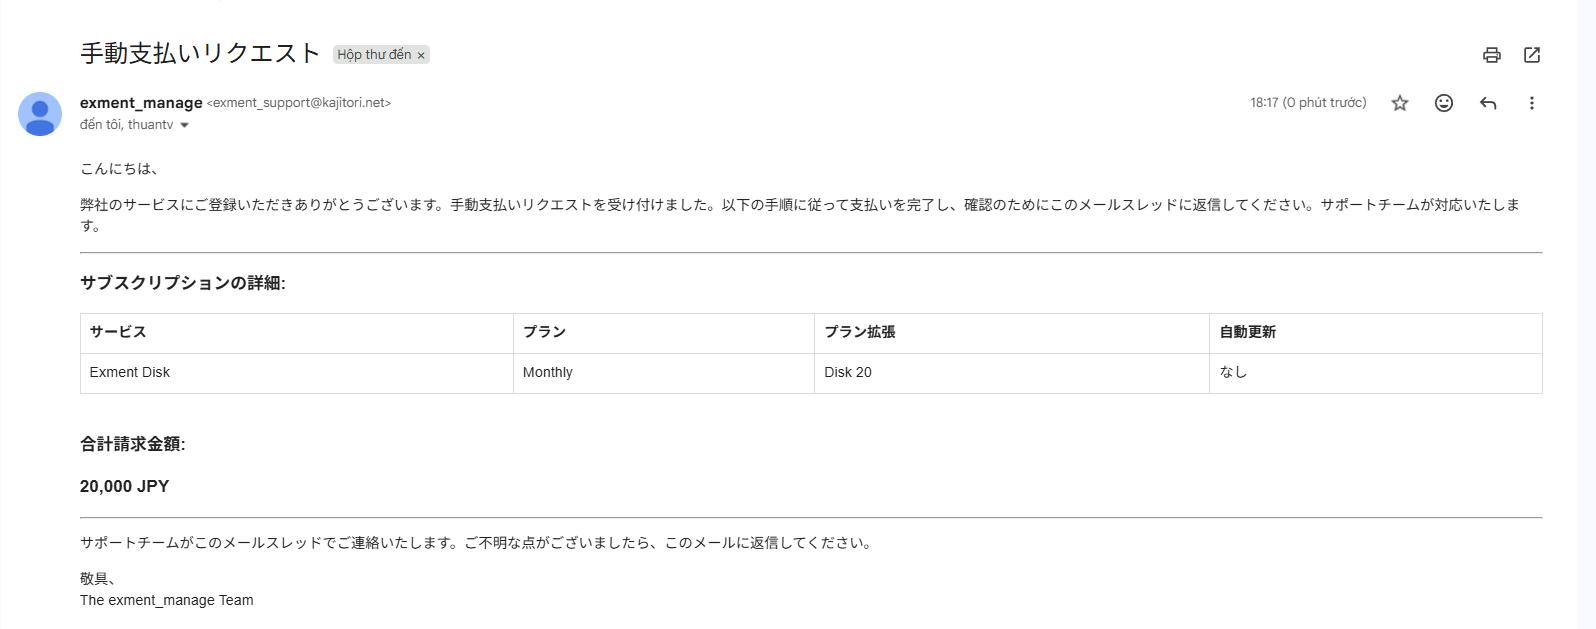
If the registration details are correct, reply to the email according to the instructions in the email.
Support will contact you regarding the payment method.
2.2.3 Checking Paid Services
- You can check registered services on the [Subscription Management] screen.
![You can check registered services on the [Subscription Management] screen.](https://exments.com/manuals/exment-manager/images/sec-2-2-3-image-01-subscription-management.png)
You can check registered services on the [Subscription Management] screen. - Transaction history and fee information are displayed on the [Receipts and Payment Management] screen.
![Transaction history and fee information are displayed on the [Receipts and Payment Management] screen.](https://exments.com/manuals/exment-manager/images/sec-2-2-3-image-02-transaction-history.png)
Transaction history and fee information are displayed on the [Receipts and Payment Management] screen. - After service registration, you can also check tenant information on the “Tenant” tab.
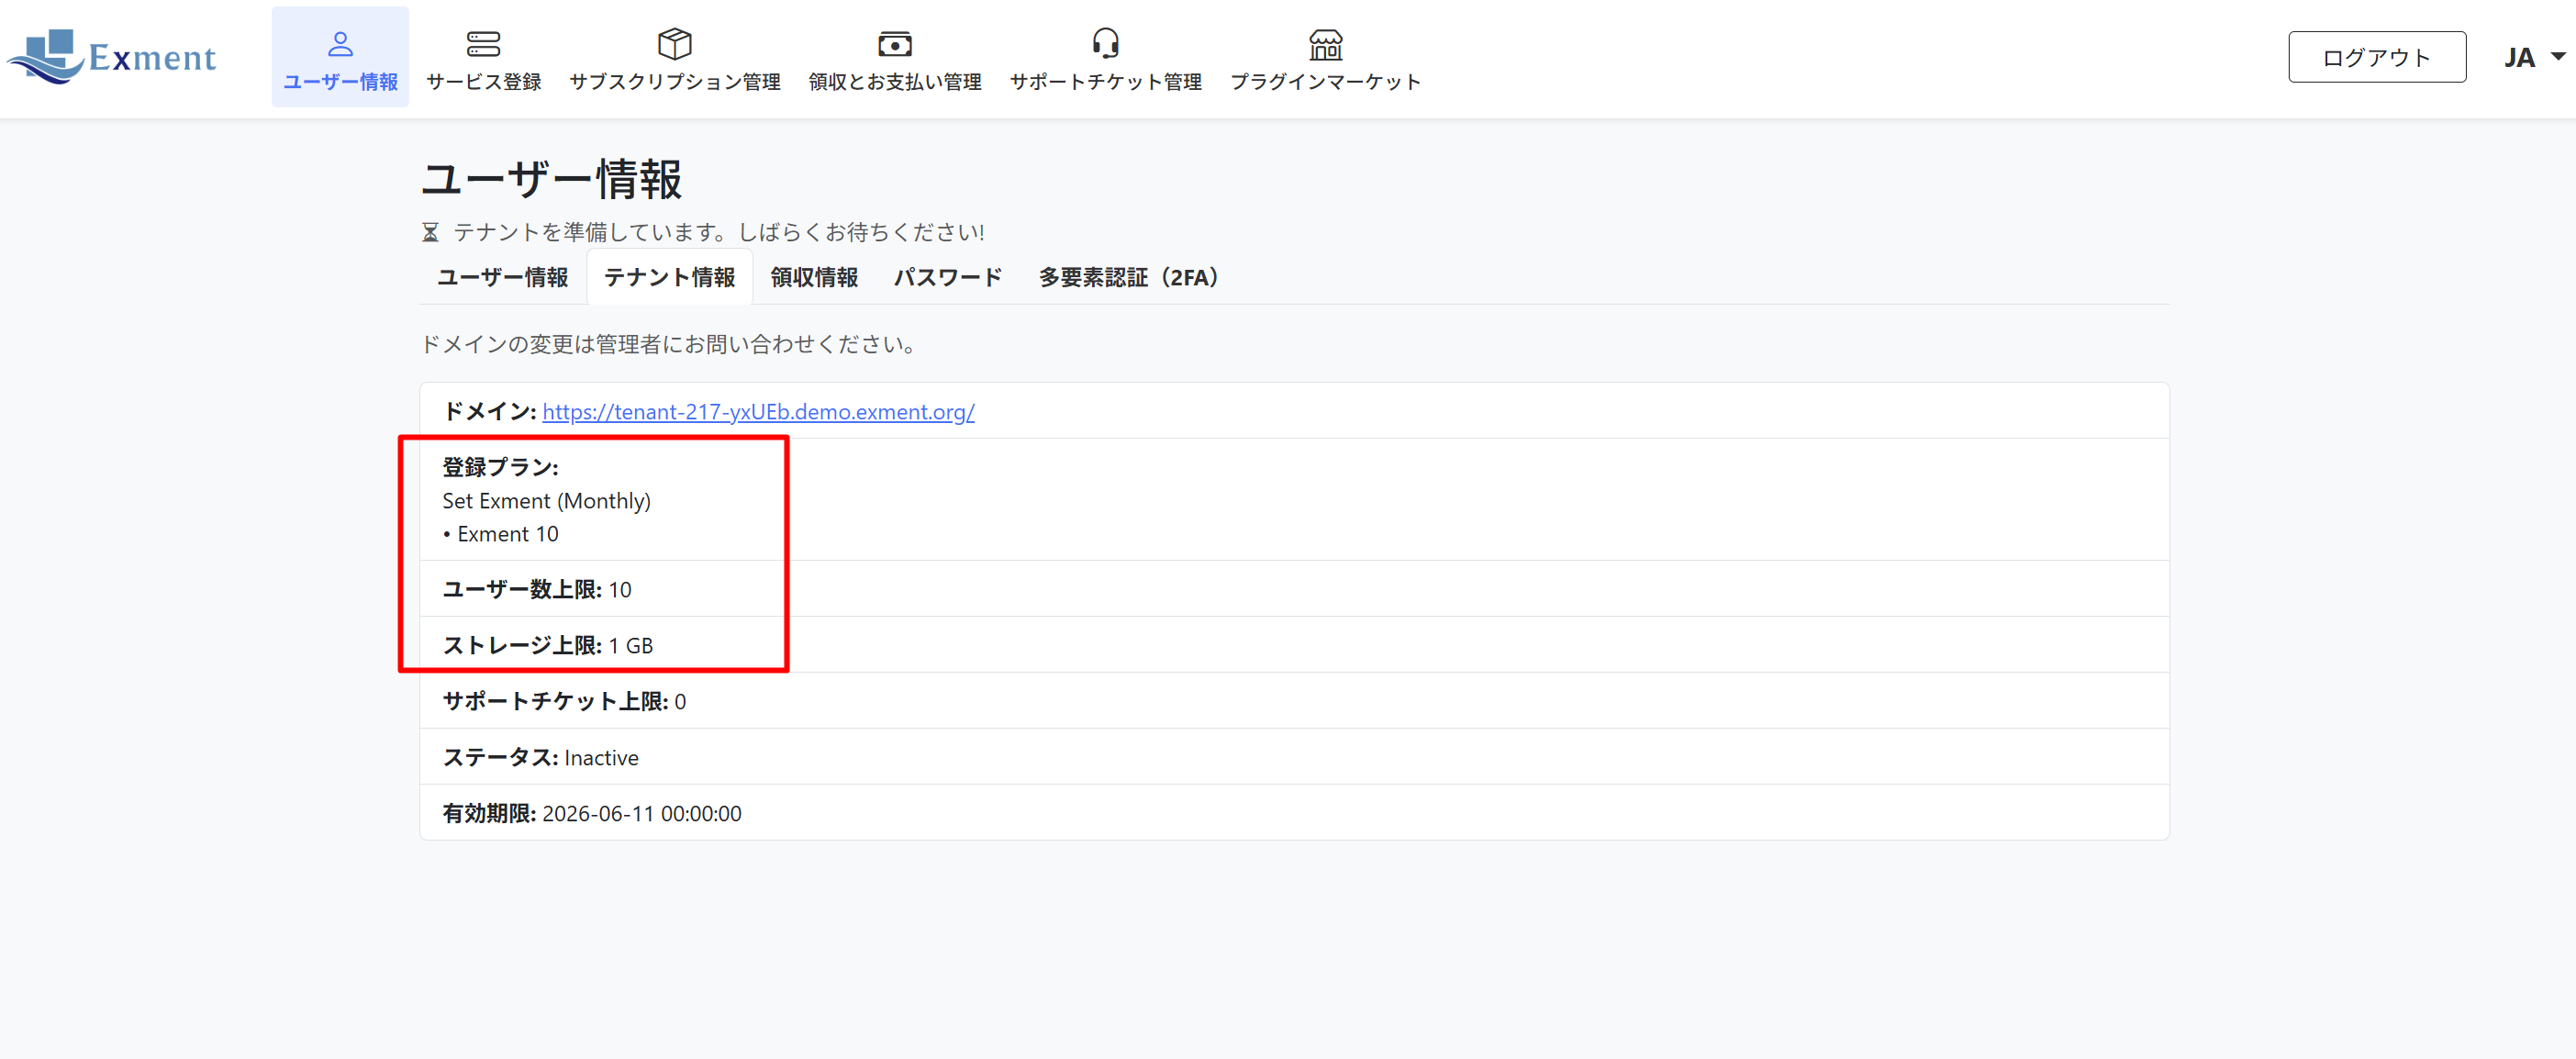
After service registration, you can also check tenant information on the “Tenant” tab. - When payment is completed successfully, a confirmation email is sent.
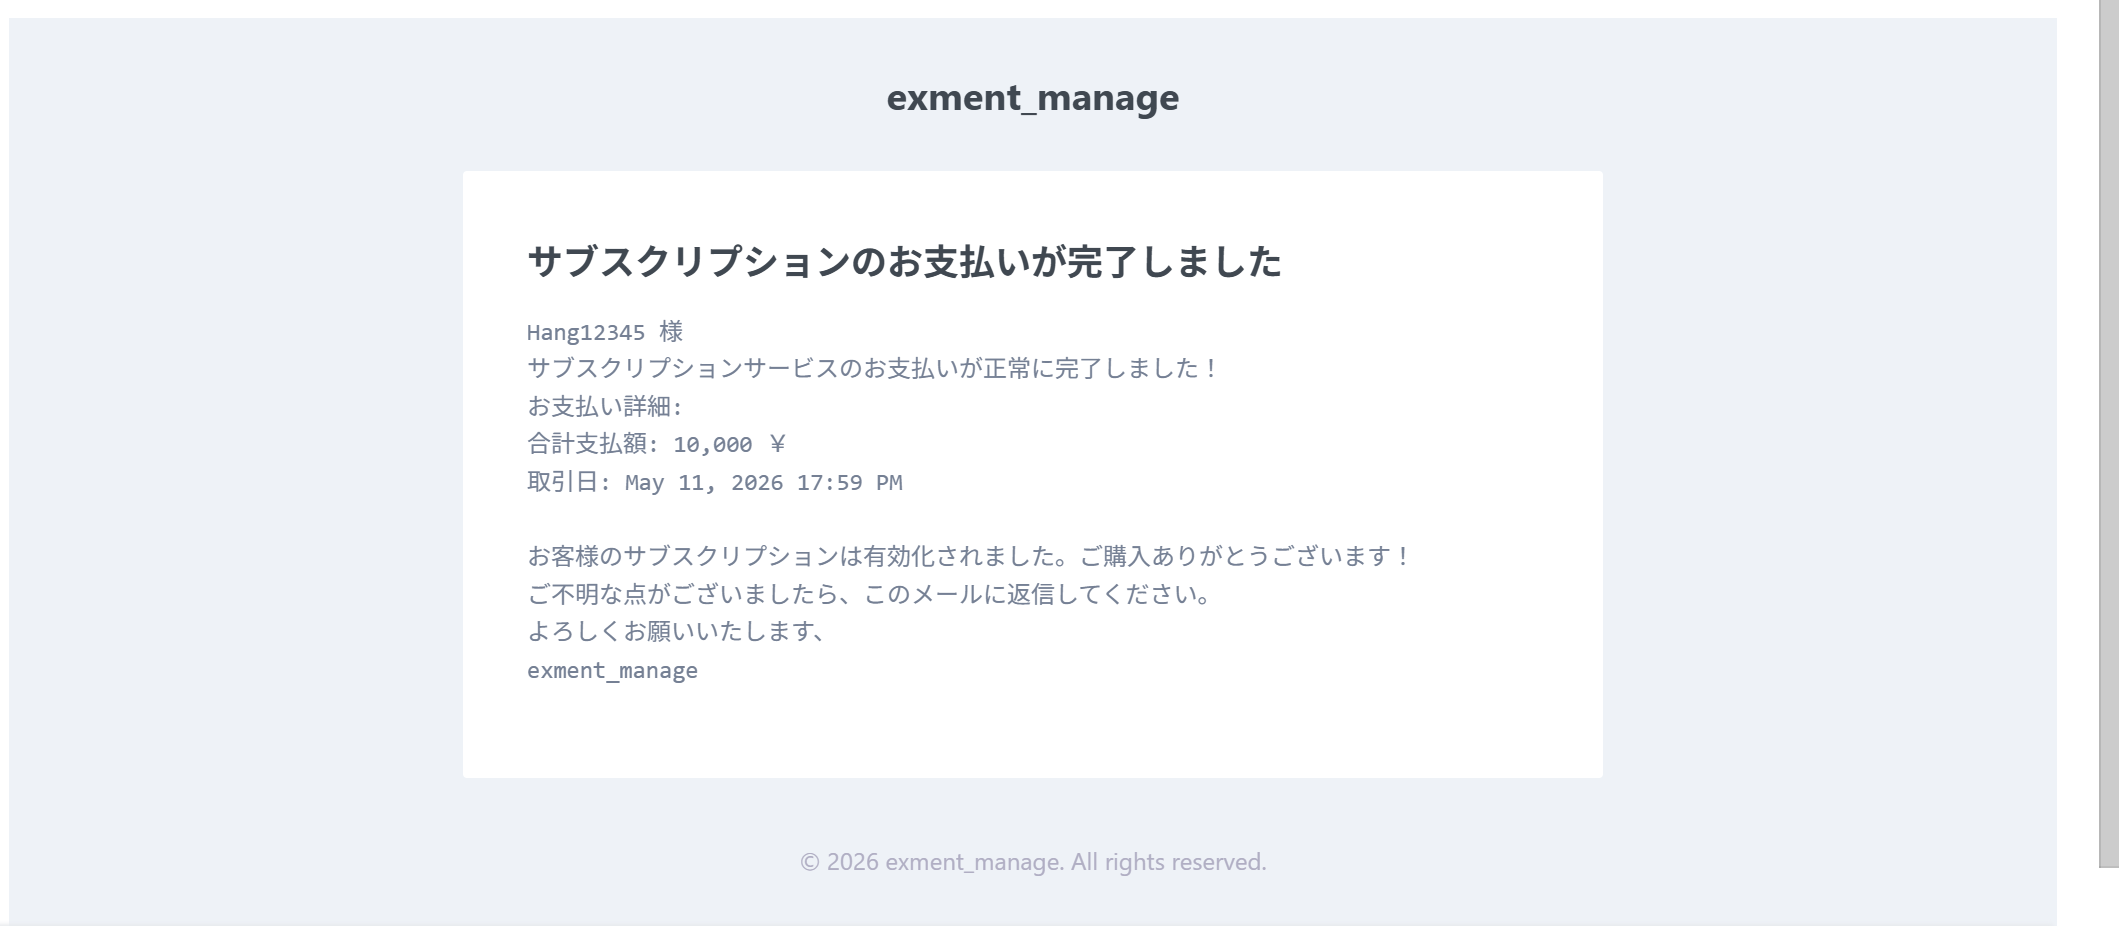
When payment is completed successfully, a confirmation email is sent.
2.3 Service Plan Change Procedure
You can upgrade the plan you are using at any time.
The fee is calculated based on the remaining usage period of the current plan.
You can change the plan from the [Change Plan] button on the [Subscription Management] screen.
![You can change the plan from the [Change Plan] button on the [Subscription Management] screen.](https://exments.com/manuals/exment-manager/images/sec-2-3-image-01-subscription-management.png)
2.4 Adding and Deleting Credit Cards
On the [Receipts and Payment Management] screen, you can add credit cards, set or change the default card, and delete cards.
- You can add a credit card.
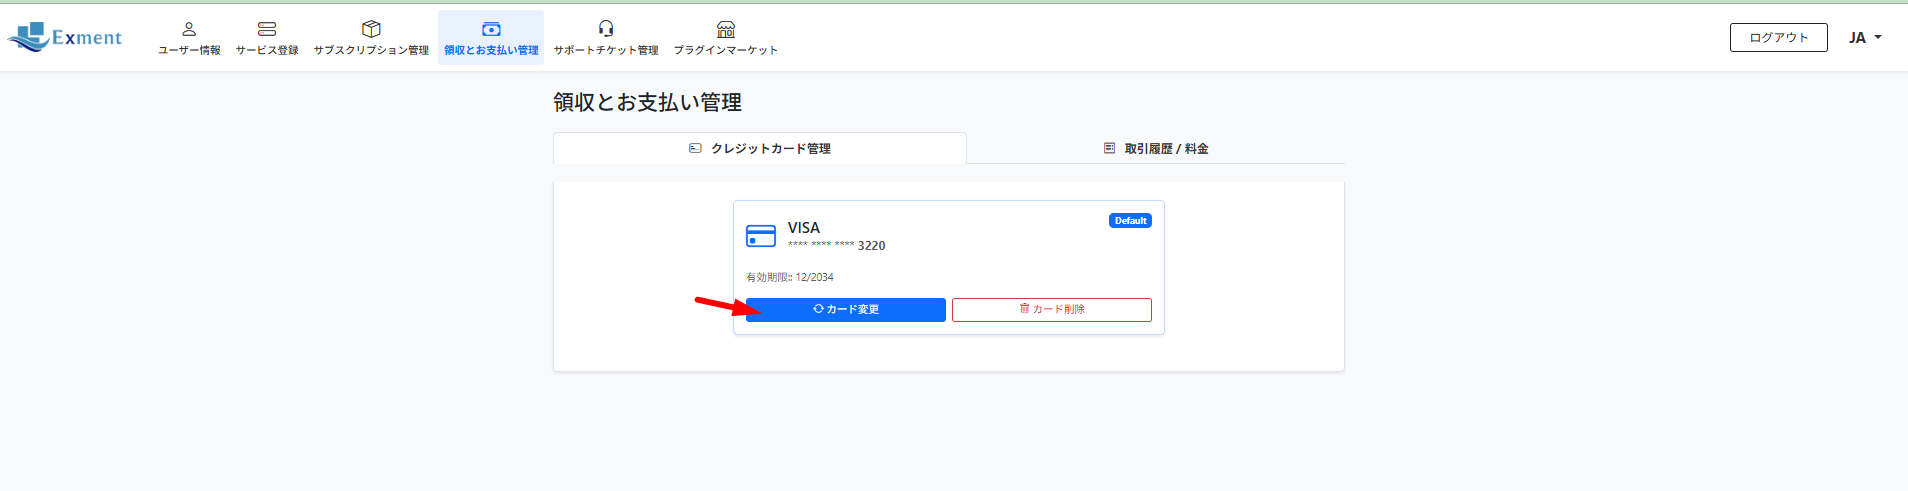
You can add a credit card. - You can set or change the default credit card.
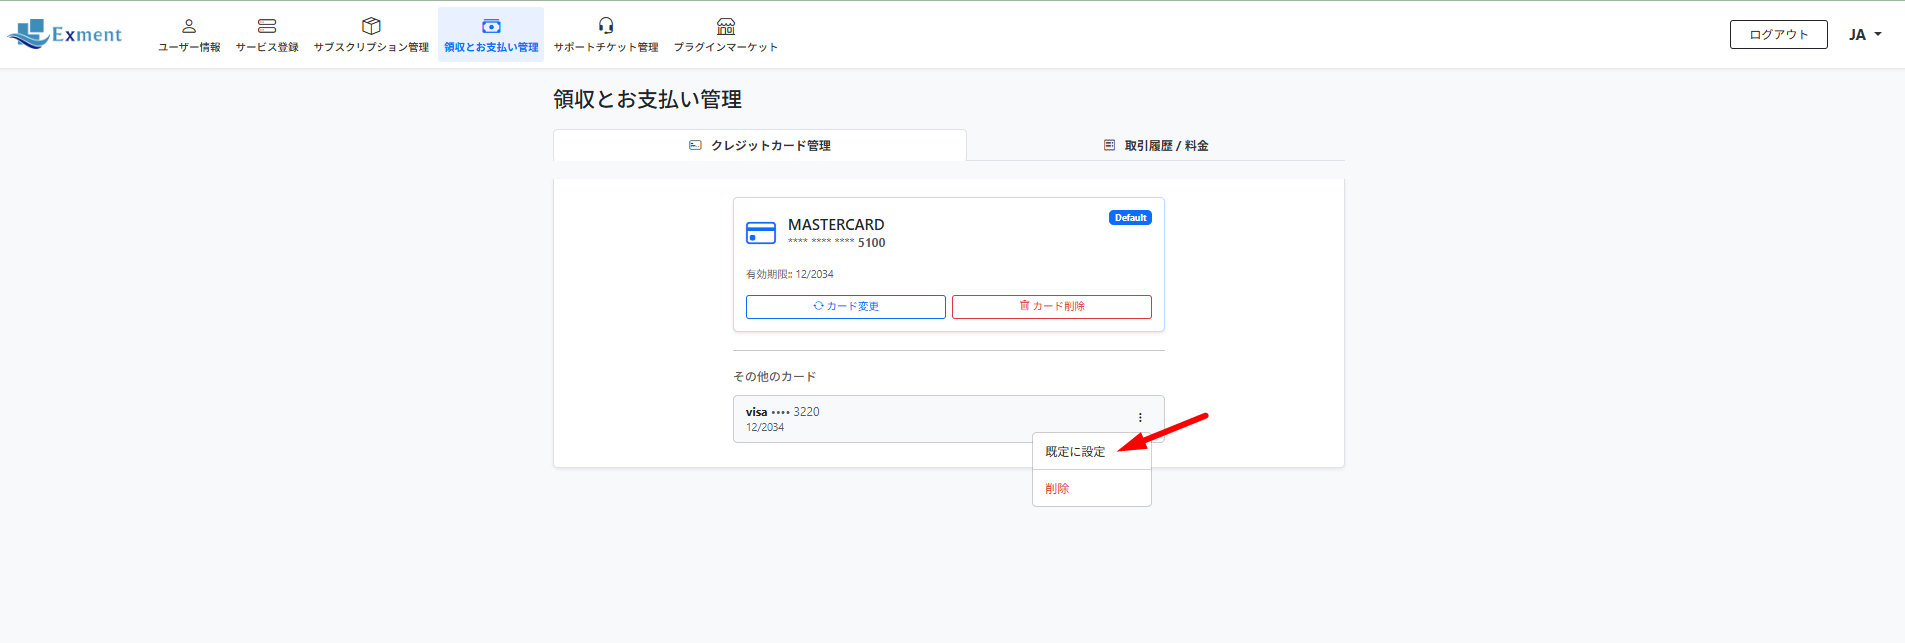
You can set or change the default credit card. - You can delete a credit card.
You can also delete it from the card number display area.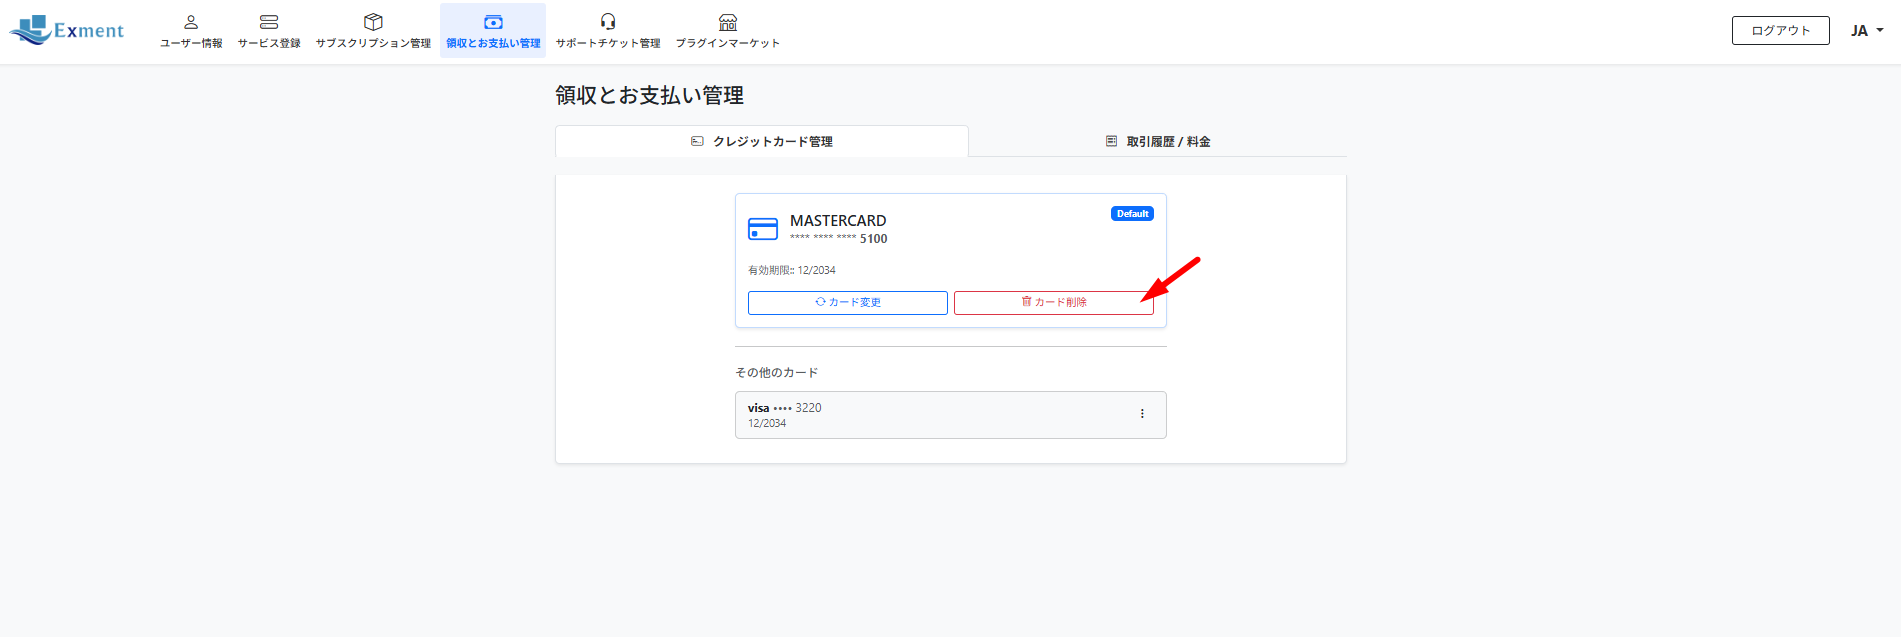
You can delete a credit card.
You can also delete it from the card number display area.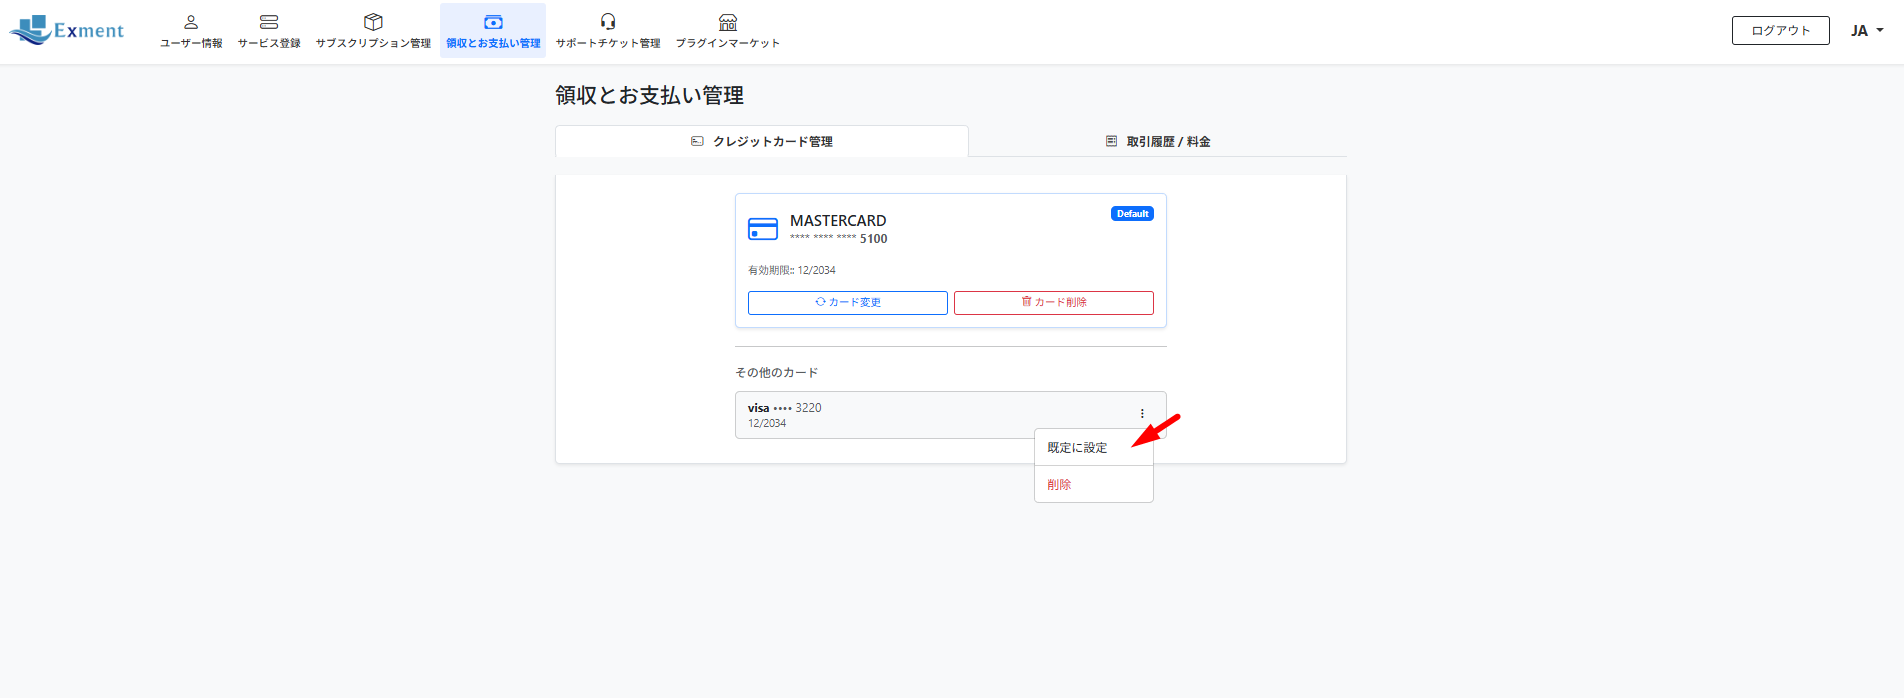
You can delete a credit card.
You can also delete it from the card number display area.
2.5 How to Use the Support Ticket Service
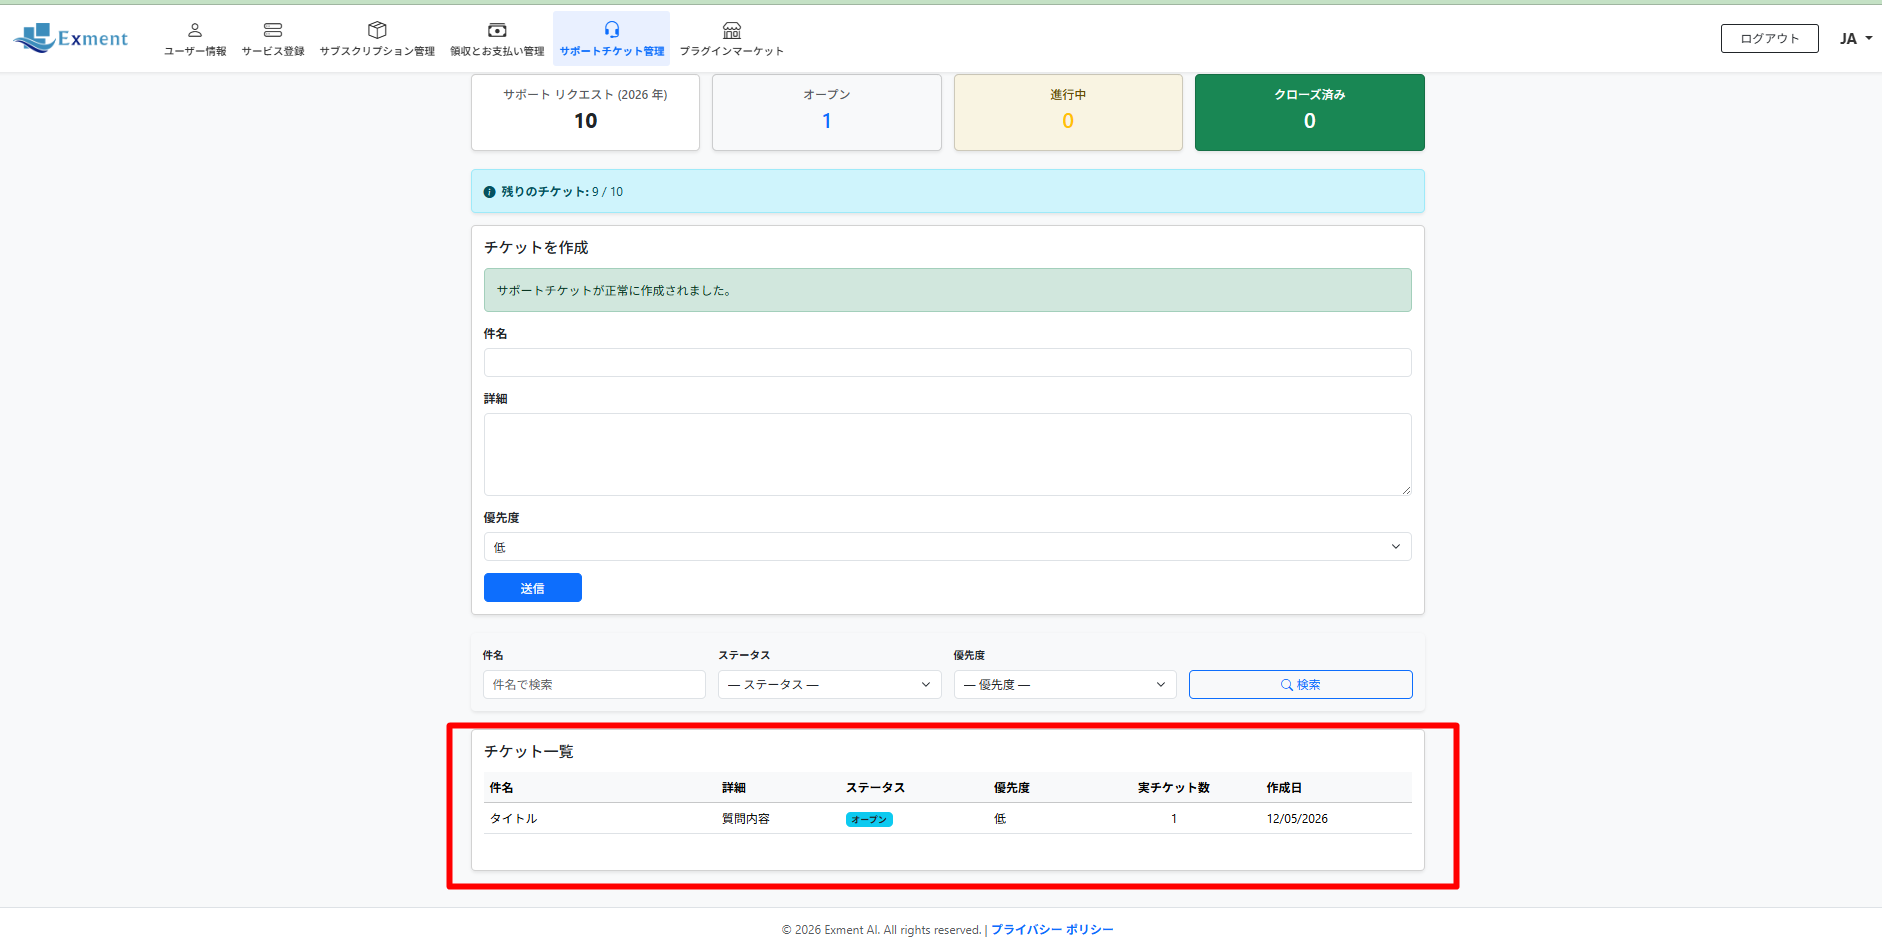
You can create a support ticket on the [Support Ticket Management] screen.
Enter the “Subject”, “Content”, and “Priority”, then click the [Send] button.
![You can create a support ticket on the [Support Ticket Management] screen.
Enter the “Subject”, “Content”, and “Priority”, then click the [Send] button.](https://exments.com/manuals/exment-manager/images/sec-2-5-image-01-support-ticket.png)
Enter the “Subject”, “Content”, and “Priority”, then click the [Send] button.
The created ticket is displayed in the ticket list.
When a ticket is created, a notification is sent to the registered email address.
After that, support staff will contact you by email and begin support handling.
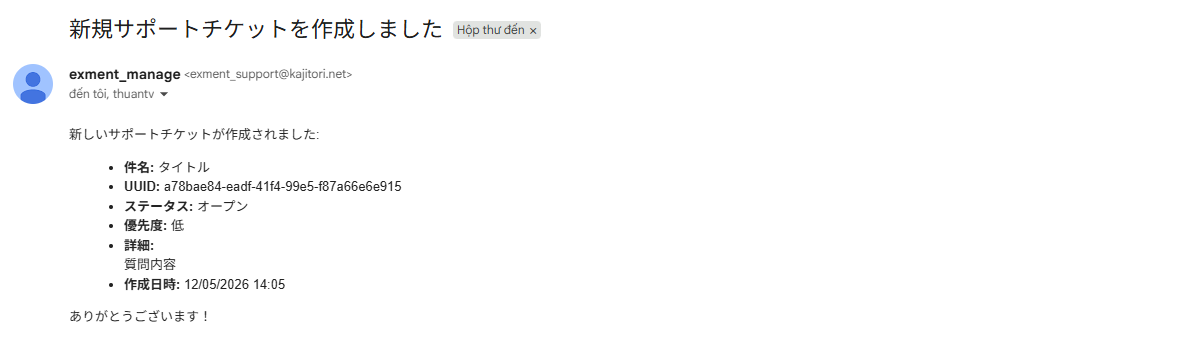
After that, support staff will contact you by email and begin support handling.
3. AI Services Usage Guide
When you register service plans such as Chat Bot, OCR, and AI Assistant in Exment Manager, they become available in the Exment tenant.
To use AI functions on the tenant side, first set the corresponding function to [YES] on the [STEP2 Detailed Settings] tab of the Exment system settings screen.
![To use AI functions on the tenant side, first set the corresponding function to [YES] on the [STEP2 Detailed Settings] tab of the Exment system settings screen.](https://exments.com/manuals/exment-manager/images/sec-3-image-01-system-settings.png)
3.1 How to Use AI-OCR
3.1.1 Creating OCR Input Columns
To enter data using the AI-OCR function, first create a custom table for input.
On the Exment [Custom Table Settings] screen, click the [New] button.
![On the Exment [Custom Table Settings] screen, click the [New] button.](https://exments.com/manuals/exment-manager/images/sec-3-1-1-image-01-custom-table-settings.png)
In the [Use AI-OCR Function] item of the custom table settings, select [YES] and click the [Save] button.
![In the [Use AI-OCR Function] item of the custom table settings, select [YES] and click the [Save] button.](https://exments.com/manuals/exment-manager/images/sec-3-1-1-image-02-custom-table-settings.png)
On the [Custom Column Settings] screen, click the [New] button.
![On the [Custom Column Settings] screen, click the [New] button.](https://exments.com/manuals/exment-manager/images/sec-3-1-1-image-03-custom-column-settings.png)
On the [Create] screen under [Custom Column Settings], enter each item and click the [Save] button.
![On the [Create] screen under [Custom Column Settings], enter each item and click the [Save] button.](https://exments.com/manuals/exment-manager/images/sec-3-1-1-image-04-custom-column-settings.png)
3.1.2 Entering Data with the [AI_OCR Import] Button
This is how to enter one data record using the AI-OCR function.
On the data creation screen of a table where the AI-OCR function is enabled, click the [AI_OCR Import] button.
![On the data creation screen of a table where the AI-OCR function is enabled, click the [AI_OCR Import] button.](https://exments.com/manuals/exment-manager/images/sec-3-1-2-image-01-ai-ocr-import.png)
Select the file to be read by the AI-OCR function and click [Send].
![Select the file to be read by the AI-OCR function and click [Send].](https://exments.com/manuals/exment-manager/images/sec-3-1-2-image-02-manual-screenshot.png)
After confirming the information, click the [Save] button.
![After confirming the information, click the [Save] button.](https://exments.com/manuals/exment-manager/images/sec-3-1-2-image-03-manual-screenshot.png)
The read data is displayed in the table data list.

3.1.3 Entering Data with the [AI-OCR Import List] Button
Using the “AI-OCR Import List” function, you can import multiple files at once and have AI-OCR read them.
On the data list screen of a table where the AI-OCR function is enabled, click the [Import/Export] button.
![On the data list screen of a table where the AI-OCR function is enabled, click the [Import/Export] button.](https://exments.com/manuals/exment-manager/images/sec-3-1-3-image-01-import-export.png)
On the [Import/Export] screen, click [AI-OCR Import List].
![On the [Import/Export] screen, click [AI-OCR Import List].](https://exments.com/manuals/exment-manager/images/sec-3-1-3-image-02-ai-ocr-bulk-import.png)
Select multiple files to be read by the AI-OCR function and click [Send].
![Select multiple files to be read by the AI-OCR function and click [Send].](https://exments.com/manuals/exment-manager/images/sec-3-1-3-image-03-ai-ocr.png)
The OCR processing result information is displayed.

The read data is displayed in the table data list.
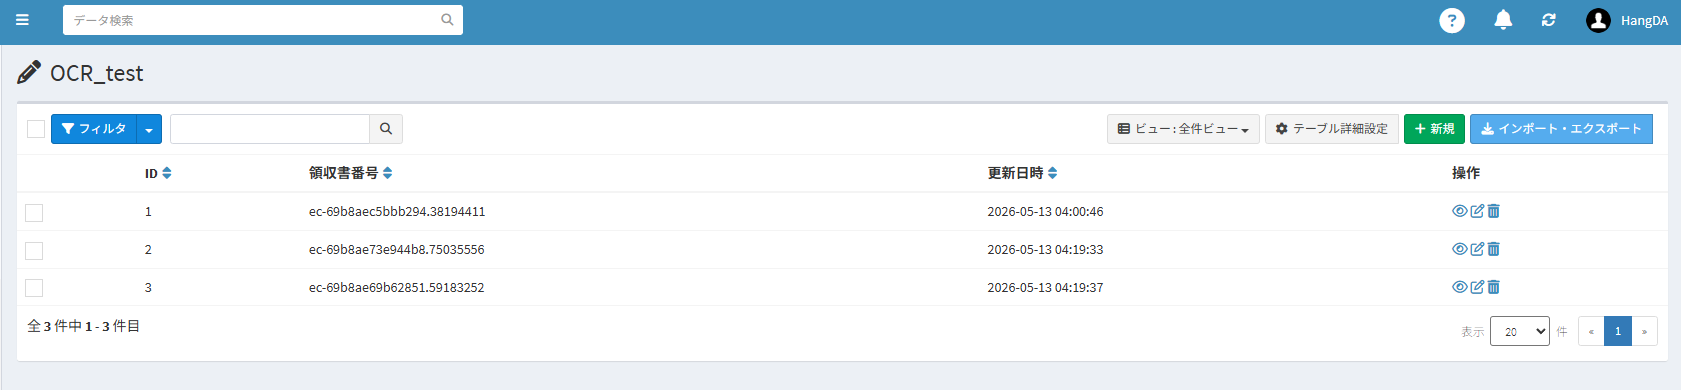
3.2 How to Use the AI Chatbot
3.2.1 Chatbot Settings
To use the AI chatbot, first enable the chatbot in the Exment settings.
In the Exment menu, select [System Settings], then select [Step 2 Detailed Settings].
In [Chatbot Settings], set [Use Chatbot] to Yes.
![In [Chatbot Settings], set [Use Chatbot] to Yes.](https://exments.com/manuals/exment-manager/images/sec-3-2-1-image-01-chatbot-settings.png)
When you click [Save], the chatbot icon appears at the lower right of the screen.
Click the icon to display the chatbot window.
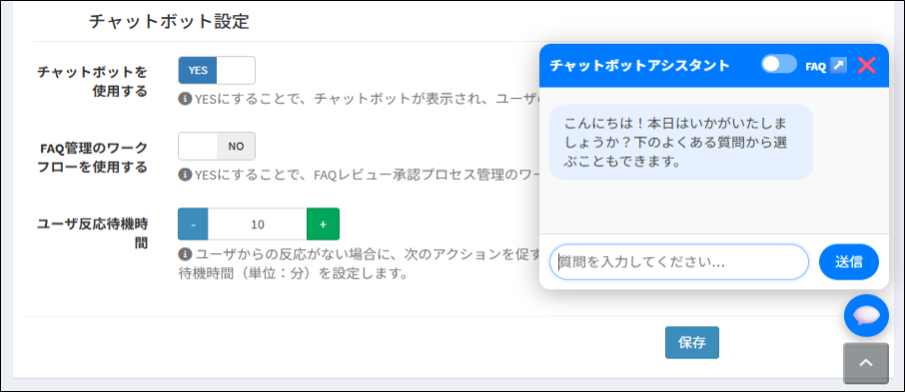
3.2.2 RAG Mode
3.2.2.1 RAG Creation Procedure
To use the chatbot in RAG Mode, first upload the documents or knowledge base that will be used as the search source.
![Exment のメニューで [カスタムテーブル設定] – [チャットボットナレッジファイル] テーブルのを「データ一覧」オプションをクリックします。](https://exments.com/manuals/exment-manager/images/sec-3-2-2-1-image-01-rag-settings.png)
![In the Exment menu, click [Chatbot Settings] – [FAQ List].](https://exments.com/manuals/exment-manager/images/sec-3-2-2-1-image-02-rag-settings.png)
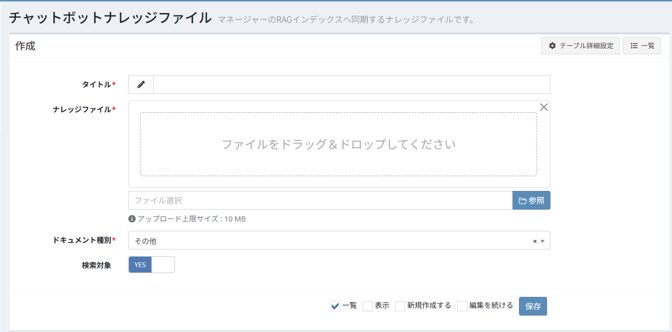
Access the **Chatbot Knowledge Files** screen, enter the document title, upload the knowledge file, and select the appropriate document type (**FAQ, Manual, Policy, Product Information, Troubleshooting, Support Script, or Other**). After saving, the document will be synchronized with the chatbot’s RAG database, allowing the chatbot to search and reference the information to provide appropriate answers to end-user inquiries.
![Set [Question Content] and [Answer Content], then click [Save].
*If you set [Featured Flag] to Yes and set the display order in [Display Order], the question will be shown as a “Recommended Question” on the chatbot screen in the specified order.](https://exments.com/manuals/exment-manager/images/sec-3-2-2-1-image-04-rag-settings.png)
*If you set [Featured Flag] to Yes and set the display order in [Display Order], the question will be shown as a “Recommended Question” on the chatbot screen in the specified order.
3.2.2.2. RAG Mode Use
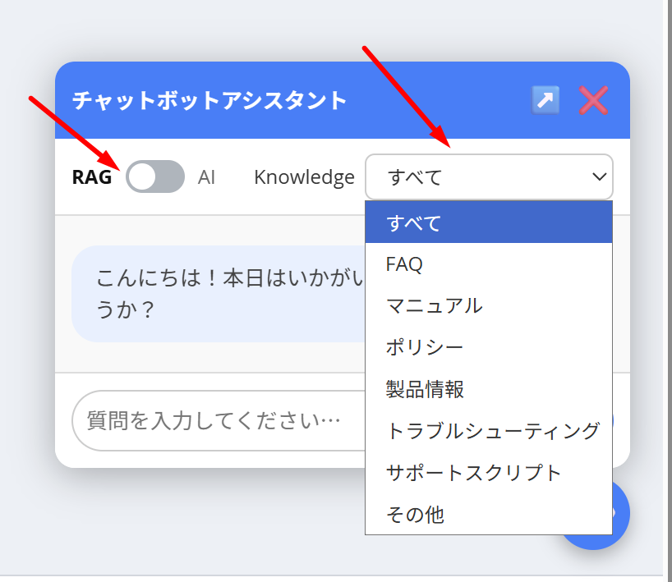
Once the knowledge file has been uploaded, enable **RAG Mode** in the chatbot settings to use the registered knowledge for generating responses.
3.2.2.3 AI Mode
The chatbot starts in RAG Mode, but you can switch it using the switch in the chatbot window.
You can switch to AI Mode.
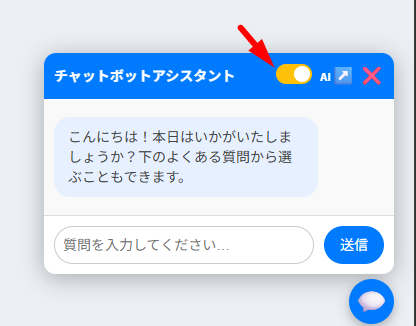
You can switch to AI Mode.
3.3 How to Use AI Assistant
AI Assistant has three functions: creating custom tables, creating workflows, and creating schedules and notifications.
3.3.1 Creating a Custom Table
Users can create tables based on instructions or ideas.
There is no need to set table names, column names, data types, and so on; all of these are automatically generated by AI.
In the Exment menu, click [AI Assistant].
![In the Exment menu, click [AI Assistant].](https://exments.com/manuals/exment-manager/images/sec-3-3-1-image-01-ai-assistant-menu.png)
On the AI Assistant screen, click [Custom Table].
![On the AI Assistant screen, click [Custom Table].](https://exments.com/manuals/exment-manager/images/sec-3-3-1-image-02-ai-assistant-menu.png)
Enter a prompt (instruction) to create the table.
Example: Please create a student list table.
AI Assistant displays table information such as the table name and column names.
If the content is correct, click the [Next] button to proceed to the next step.
If corrections are needed, click the [Edit] button.
![AI Assistant displays table information such as the table name and column names.
If the content is correct, click the [Next] button to proceed to the next step.
If corrections are needed, click the [Edit] button.](https://exments.com/manuals/exment-manager/images/sec-3-3-1-image-03-ai-assistant-menu.png)
If the content is correct, click the [Next] button to proceed to the next step.
If corrections are needed, click the [Edit] button.
AI Assistant displays information about the data types of the columns.
Check the content, and if there are no issues, click [Next] to proceed to the next step.
If corrections are needed, click the [Edit] button.
![AI Assistant displays information about the data types of the columns.
Check the content, and if there are no issues, click [Next] to proceed to the next step.
If corrections are needed, click the [Edit] button.](https://exments.com/manuals/exment-manager/images/sec-3-3-1-image-04-ai-assistant-menu.png)
Check the content, and if there are no issues, click [Next] to proceed to the next step.
If corrections are needed, click the [Edit] button.
AI Assistant executes the table creation process.

The created table is displayed on the [Custom Table List] screen.
![The created table is displayed on the [Custom Table List] screen.](https://exments.com/manuals/exment-manager/images/sec-3-3-1-image-06-custom-table.png)
3.3.2 Workflow Creation Procedure
Users can create workflows based on instructions or ideas.
There is no need to set workflow names, statuses, or actions; all of these are automatically generated by AI.
In the Exment menu, click [AI Assistant].
On the AI Assistant screen, click [Workflow].
![On the AI Assistant screen, click [Workflow].](https://exments.com/manuals/exment-manager/images/sec-3-3-2-image-01-ai-assistant-menu.png)
Enter a prompt (instruction) to create the workflow.
Example: Please create a workflow for the ~ table.
AI Assistant displays the content of the workflow to be created.
Review the content, and if there are no issues, click the [Next] button to proceed to the next step.
If corrections are needed, click the [Edit] button and enter the specific correction details.
![AI Assistant displays the content of the workflow to be created.
Review the content, and if there are no issues, click the [Next] button to proceed to the next step.
If corrections are needed, click the [Edit] button and enter the specific correction details.](https://exments.com/manuals/exment-manager/images/sec-3-3-2-image-02-ai-assistant-menu.png)
Review the content, and if there are no issues, click the [Next] button to proceed to the next step.
If corrections are needed, click the [Edit] button and enter the specific correction details.
AI Assistant displays information about workflow actions.
Review the content, and if there are no issues, click the [Next] button to proceed to the next step.
If corrections are needed, click the [Edit] button and enter the specific correction details.
![AI Assistant displays information about workflow actions.
Review the content, and if there are no issues, click the [Next] button to proceed to the next step.
If corrections are needed, click the [Edit] button and enter the specific correction details.](https://exments.com/manuals/exment-manager/images/sec-3-3-2-image-03-ai-assistant-menu.png)
Review the content, and if there are no issues, click the [Next] button to proceed to the next step.
If corrections are needed, click the [Edit] button and enter the specific correction details.
AI Assistant executes the workflow creation process.

The created workflow is displayed on the [Workflow List] screen.
![The created workflow is displayed on the [Workflow List] screen.](https://exments.com/manuals/exment-manager/images/sec-3-3-2-image-05-workflow-list.png)
3.3.3 Schedule and Notification Creation Procedure
Managing email sending and meeting schedules within an organization can become complicated, but by using AI, these tasks can be performed more quickly and efficiently.
In the Exment menu, click [AI Assistant].
![In the Exment menu, click [AI Assistant].](https://exments.com/manuals/exment-manager/images/sec-3-3-3-image-01-ai-assistant-menu.png)
On the AI Assistant screen, click [Schedule and Notification].
![On the AI Assistant screen, click [Schedule and Notification].](https://exments.com/manuals/exment-manager/images/sec-3-3-3-image-02-ai-assistant-menu.png)
On the [Please select recipients for notifications or schedules] screen, select the recipients to whom notifications or schedules will be sent.
![On the [Please select recipients for notifications or schedules] screen, select the recipients to whom notifications or schedules will be sent.](https://exments.com/manuals/exment-manager/images/sec-3-3-3-image-03-recipient-selection.png)
Enter a prompt (instruction) to create a schedule or notification.
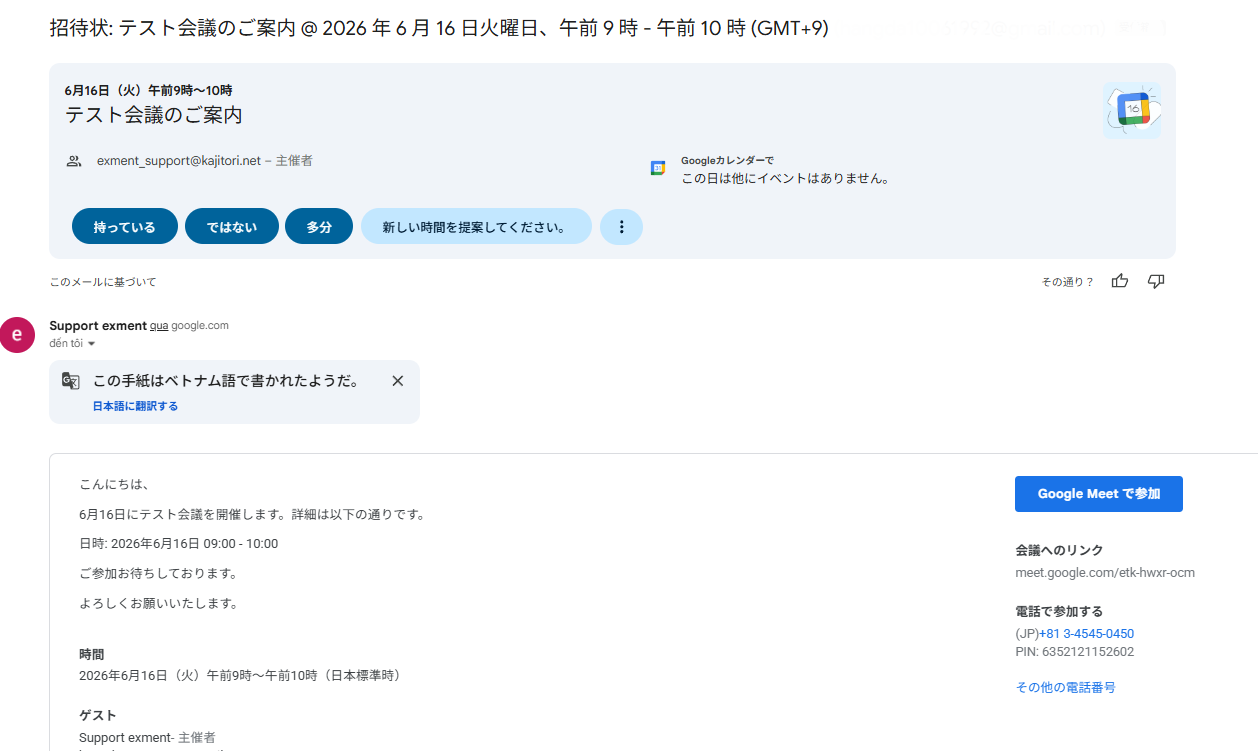
Example: Please create a test meeting on June 16.
AI Assistant creates the schedule and notification content.
Review the content, and if there are no issues, click the [Next] button to proceed to the next step.
If corrections are needed, click the [Edit] button and enter the specific correction details.
![AI Assistant creates the schedule and notification content.
Review the content, and if there are no issues, click the [Next] button to proceed to the next step.
If corrections are needed, click the [Edit] button and enter the specific correction details.](https://exments.com/manuals/exment-manager/images/sec-3-3-3-image-04-ai-assistant-menu.png)
Review the content, and if there are no issues, click the [Next] button to proceed to the next step.
If corrections are needed, click the [Edit] button and enter the specific correction details.
The screen changes to the confirmation screen for the created schedule and notification content.
When you click the [Send] button, an email is sent to the selected recipients.
![The screen changes to the confirmation screen for the created schedule and notification content.
When you click the [Send] button, an email is sent to the selected recipients.](https://exments.com/manuals/exment-manager/images/sec-3-3-3-image-05-schedule-notification.png)
When you click the [Send] button, an email is sent to the selected recipients.
The schedule and notification content sent by email appears as follows.
4. Plugin Market
In Exment Manager, you can use the “Plugin Market” to obtain plugins that extend Exment functions. Plugins include both free and paid options.
You can also distribute and sell Exment plugins that you have developed yourself.
4.1 Purchasing and Installing Plugins
4.4.1 Where to Purchase Plugins
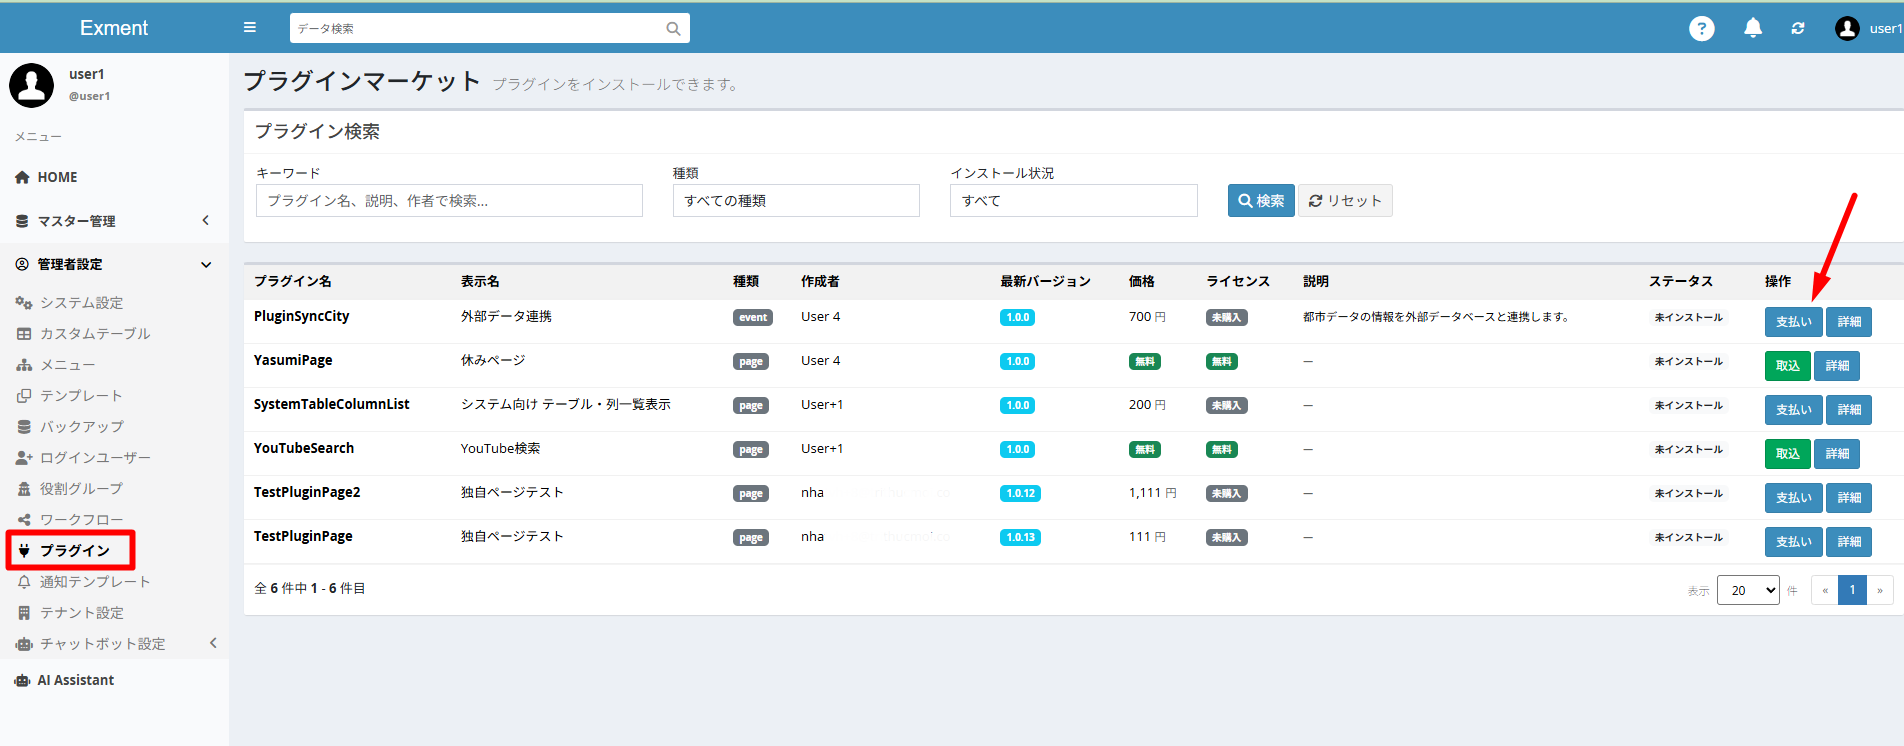
You can purchase paid plugins from the “Plugin Market” item in Exment Manager.
Clicking the [Payment] button displays the payment screen.
After payment is complete, the plugin can be installed.
![You can purchase paid plugins from the “Plugin Market” item in Exment Manager.
Clicking the [Payment] button displays the payment screen.
After payment is complete, the plugin can be installed.](https://exments.com/manuals/exment-manager/images/sec-4-4-1-image-01-plugin-payment.png)
Clicking the [Payment] button displays the payment screen.
After payment is complete, the plugin can be installed.
Click the button to display detailed plugin information. Please review it before purchasing.
You can also purchase directly from the Exment tenant.
4.1.2 Plugin Setup Procedure
Open [Plugins] in the Exment tenant.
For free plugins and purchased plugins, the [Import] button is displayed.
Click the [Import] button.
![For free plugins and purchased plugins, the [Import] button is displayed.
Click the [Import] button.](https://exments.com/manuals/exment-manager/images/sec-4-1-2-image-01-plugin-import.png)
Click the [Import] button.
Select the version of the plugin to install.
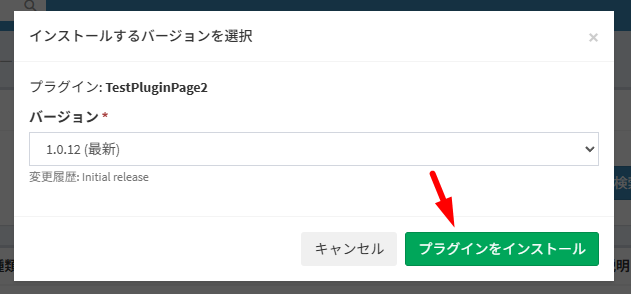
The plugin installation is performed.
When installation is complete, the [Settings] button is displayed.
Clicking the [Settings] button lets you configure settings specific to the installed plugin.
![The plugin installation is performed.
When installation is complete, the [Settings] button is displayed.
Clicking the [Settings] button lets you configure settings specific to the installed plugin.](https://exments.com/manuals/exment-manager/images/sec-4-1-2-image-03-plugin.png)
When installation is complete, the [Settings] button is displayed.
Clicking the [Settings] button lets you configure settings specific to the installed plugin.
4.2 Plugin Upload Procedure
You can distribute and sell Exment plugins you created yourself in the Plugin Market.
If you sell paid plugins, you can collect fees by setting up Stripe Connect. *If you distribute free plugins, Stripe Connect setup is not required.
Stripe Connect can be configured from the [Stripe Connect] button on the Plugin Market screen. *You will be redirected to the Stripe website.
![Stripe Connect can be configured from the [Stripe Connect] button on the Plugin Market screen. *You will be redirected to the Stripe website.](https://exments.com/manuals/exment-manager/images/sec-4-2-image-01-stripe-connect.png)
When integration with Stripe is complete, users can upload paid plugins. After that, you can receive usage fees from users through Exment Manager.
To use this function, you need to configure Stripe Connect and complete the procedure according to Stripe's instructions.
This is an important step for linking your account with our system.
After completing the Stripe Connect setup, you will be able to set a price when uploading a plugin.